
Published 2 October 2026 · Dell G15 5511 case study
Dell G15 5511 cleaning & repasting
the hidden half of the job.
A Dell G15 can have two working fans and still struggle to move heat away from its processor. The part you can hear is only one part of the cooling system. Dust affects the airflow; the contact between the chips and the heatsink affects how heat gets into that airflow in the first place.
The laptop
Dell G15 5511
The work
Cooling clean & repasting
The access
Motherboard removal required
This Dell G15 5511 cleaning and repasting job shows both sides of that story. The photographs reveal dust on the fan blades, the motherboard removed to reach the cooling assembly, old thermal paste on the contact surfaces, and fresh paste being applied. If you own a similar G15, the useful lesson is understanding what needs access before deciding whether to tackle it yourself.
In this case study
01 / Reaching the cooling system
What makes the Dell G15 5511 different to clean?
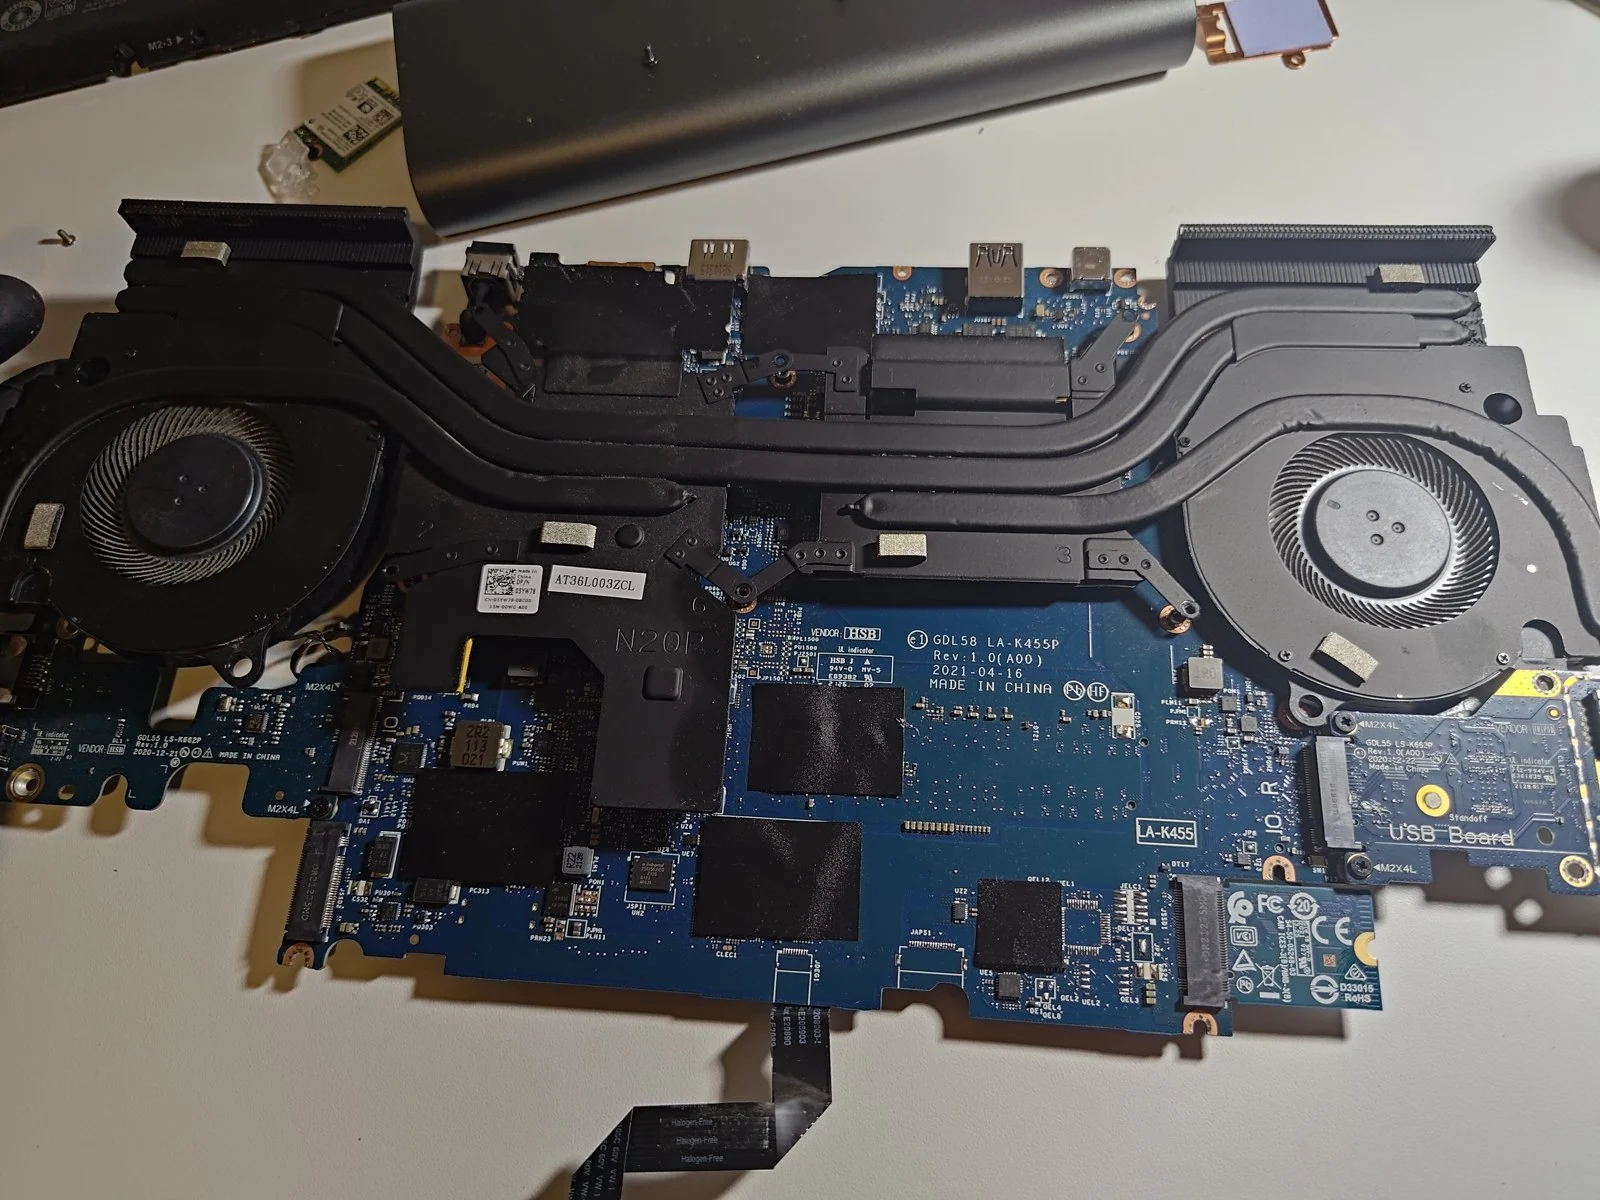
Taking the bottom cover off gives you a view of the fans. It does not give you direct access to the processor and graphics-chip contact surfaces. On this design, those surfaces are on the other side of the motherboard—the main circuit board inside the laptop.
That is the point where a seemingly simple cleaning job becomes more involved. To renew the paste properly, the board has to come out and be turned over. Our photographs show the cooling assembly outside the chassis, with the two fans linked by black heat pipes.
Dell’s G15 5511 heatsink removal instructions confirm this access route. Use the manual for your exact model: a G15 5510, 5511, 5515 or later version should not be treated as an identical machine.
02 / Following the air path
Dust on the blades: follow the whole air path
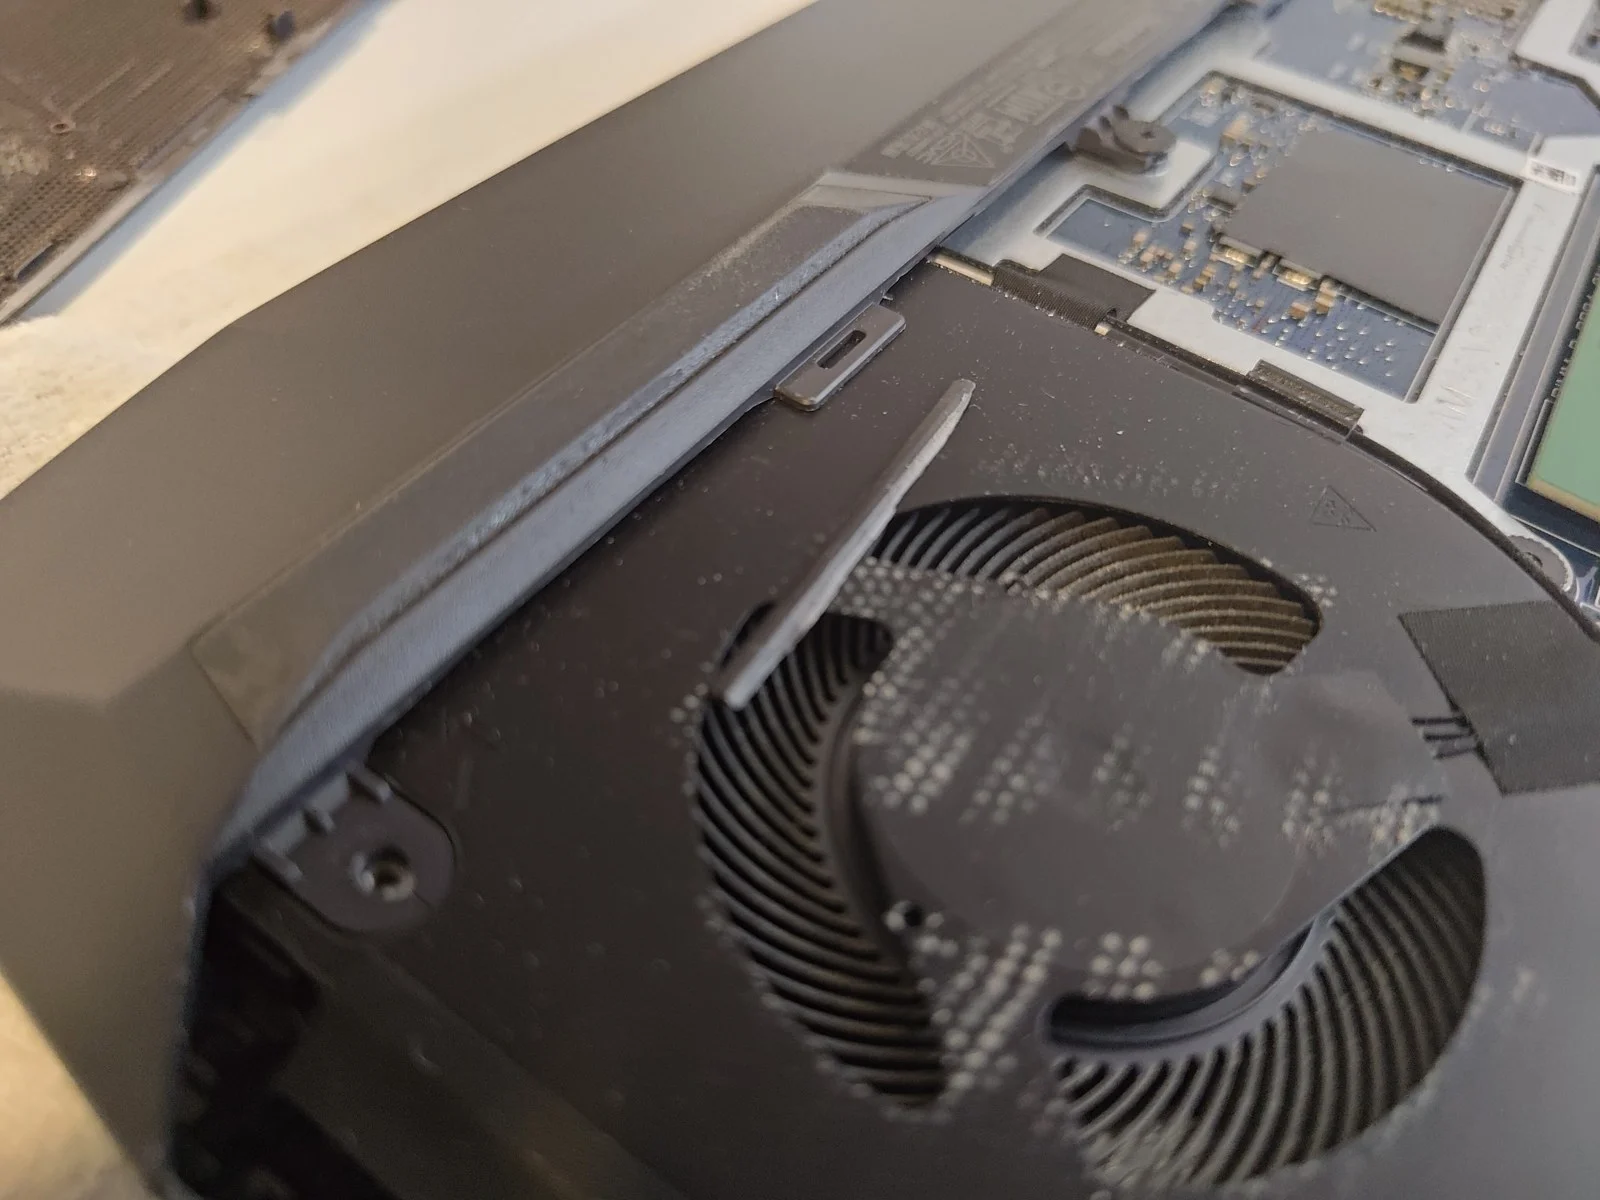
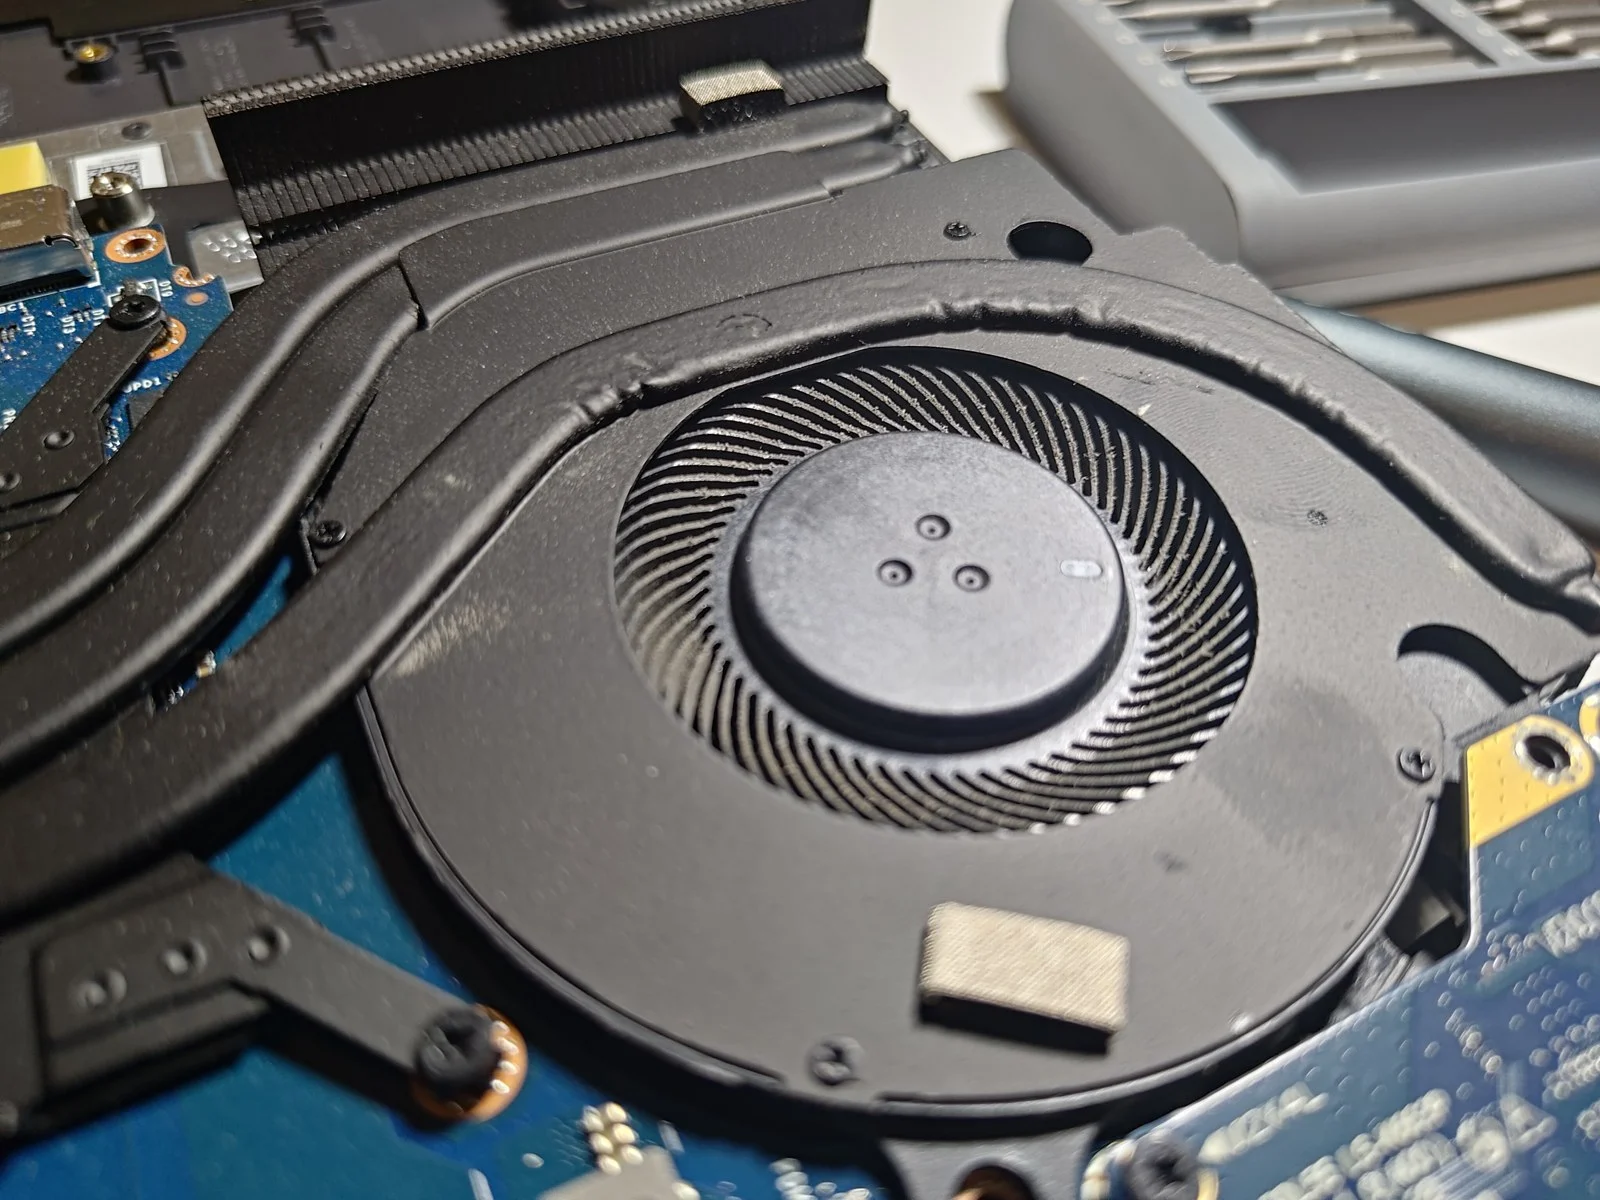
Look closely at the first photograph. The dust sits along the curved blades, rather than appearing as one obvious lump over the vent. From outside, you would miss much of it.
I think of laptop cooling as a route with several checkpoints. Air enters through the intake, the fan moves it, and it passes through thin metal fins before leaving the machine. Those fins give the heat somewhere to escape. Cleaning one visible opening leaves the rest of that route unchecked.
For this type of service, the areas to inspect are both fans, their housings, the intake openings and the exhaust fins. A soft brush and controlled air can help once the parts are accessible. The fan should be held still during air cleaning, and debris should be removed from the laptop rather than pushed into another corner.
The pictures show blade dust, but do not establish that either exhaust was completely blocked. That distinction matters: the amount of dirt visible in one photograph does not tell you the whole cooling condition.
03 / Restoring the contact surfaces
The hidden half of the job: old thermal paste
The processor (CPU) and graphics chip (GPU) generate heat. The heatsink sits against them and carries that heat away through the pipes. Thermal paste fills tiny irregularities between the chip surface and the heatsink so they can transfer heat effectively.
Once the cooler was lifted on this Dell, the old grey paste was visible on the chip surfaces and copper contact plates. The close-up below shows the imprint left on one plate. A photograph of old paste cannot, by itself, prove how much it affected temperatures. It does show why blowing air through a vent cannot replace a repasting job.
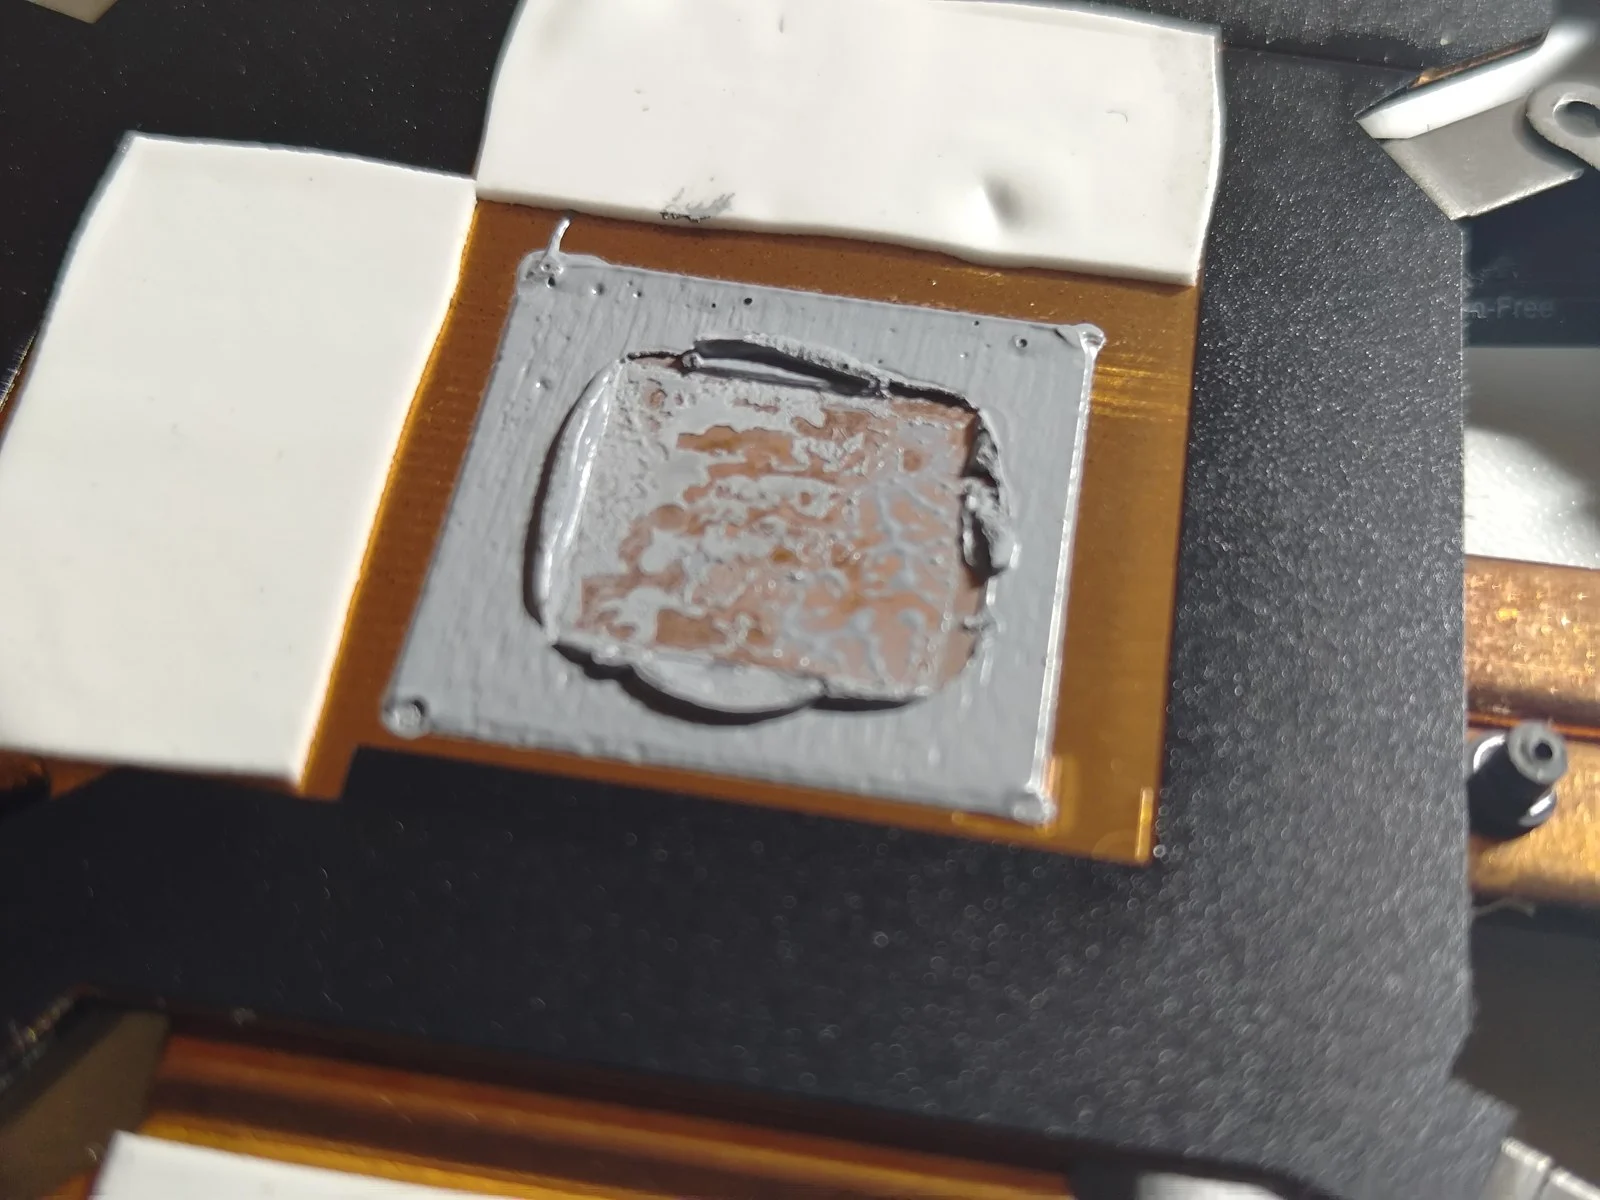
When a heatsink is removed for this work, I clean away the old paste from both mating surfaces before applying fresh material. Adding new paste on top of the old layer leaves an uncertain contact surface.
The preparation photograph shows the exposed CPU and NVIDIA graphics chip after the old paste was removed. The application photograph shows ARCTIC MX-4 being used on the processor. That is the product visible in this job, rather than a recommendation that every G15 needs the same material.
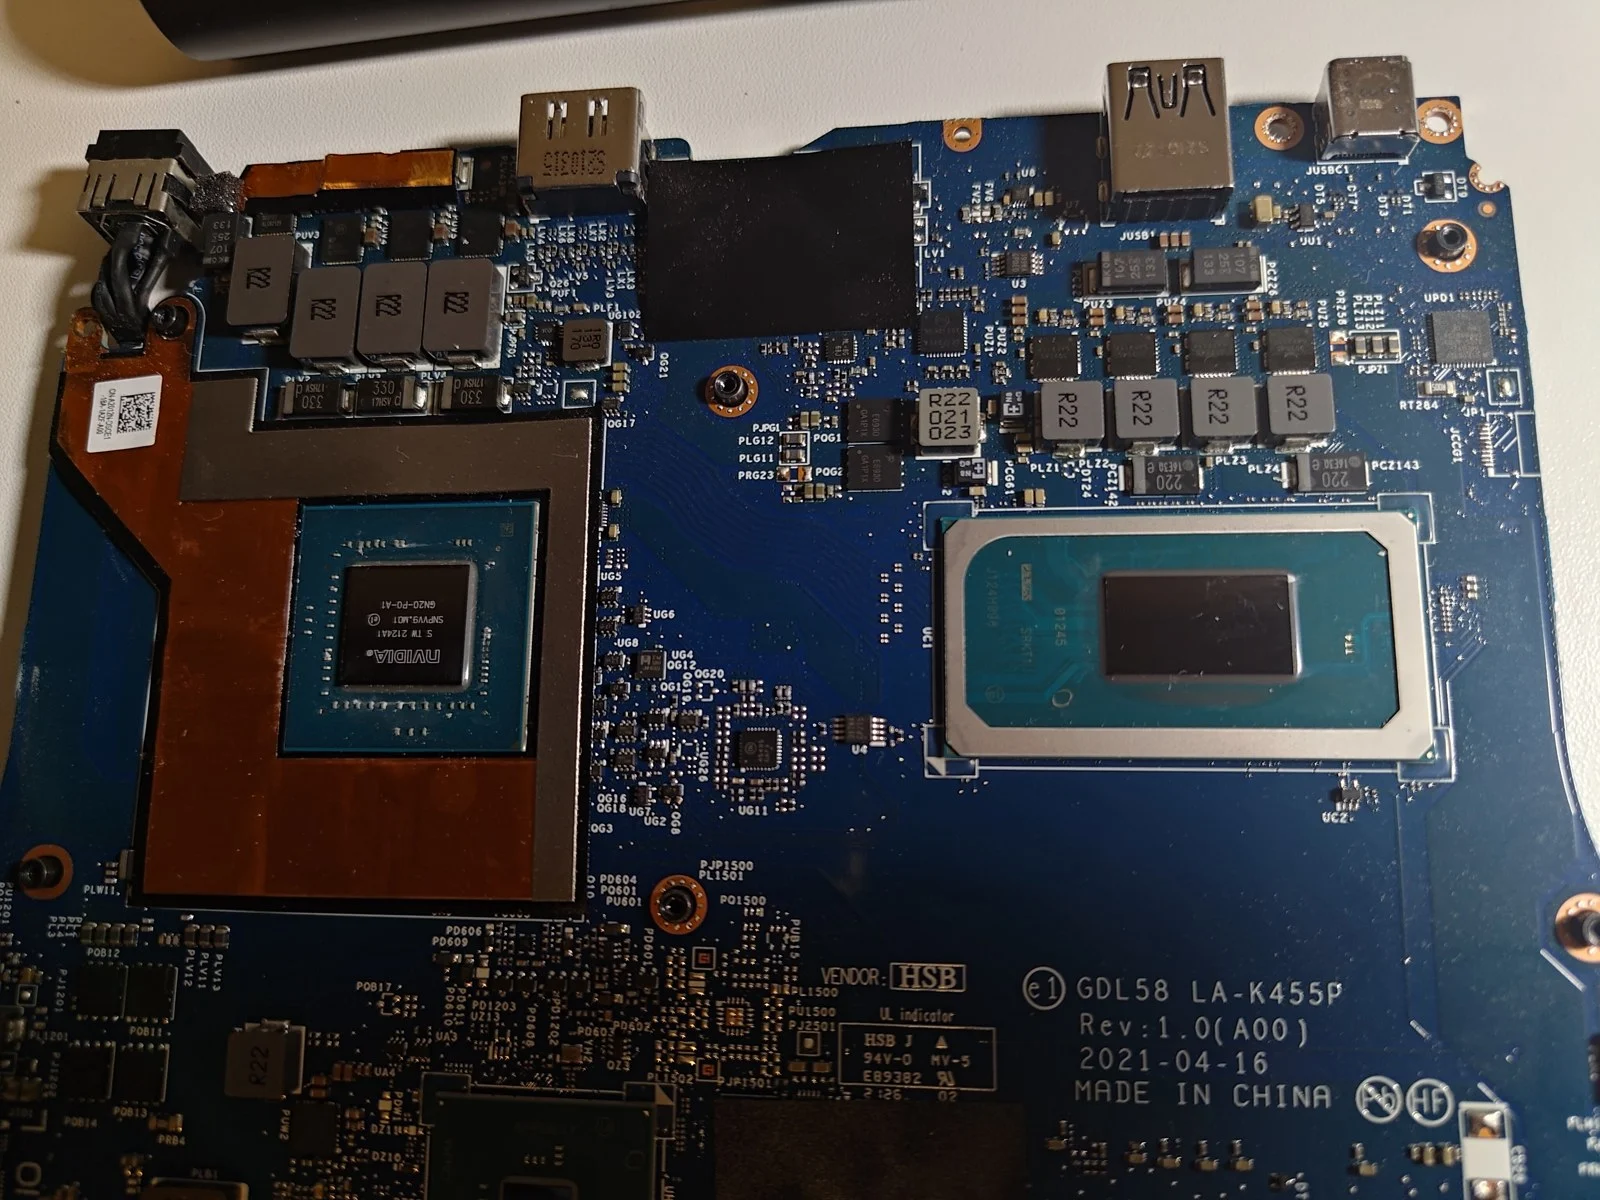
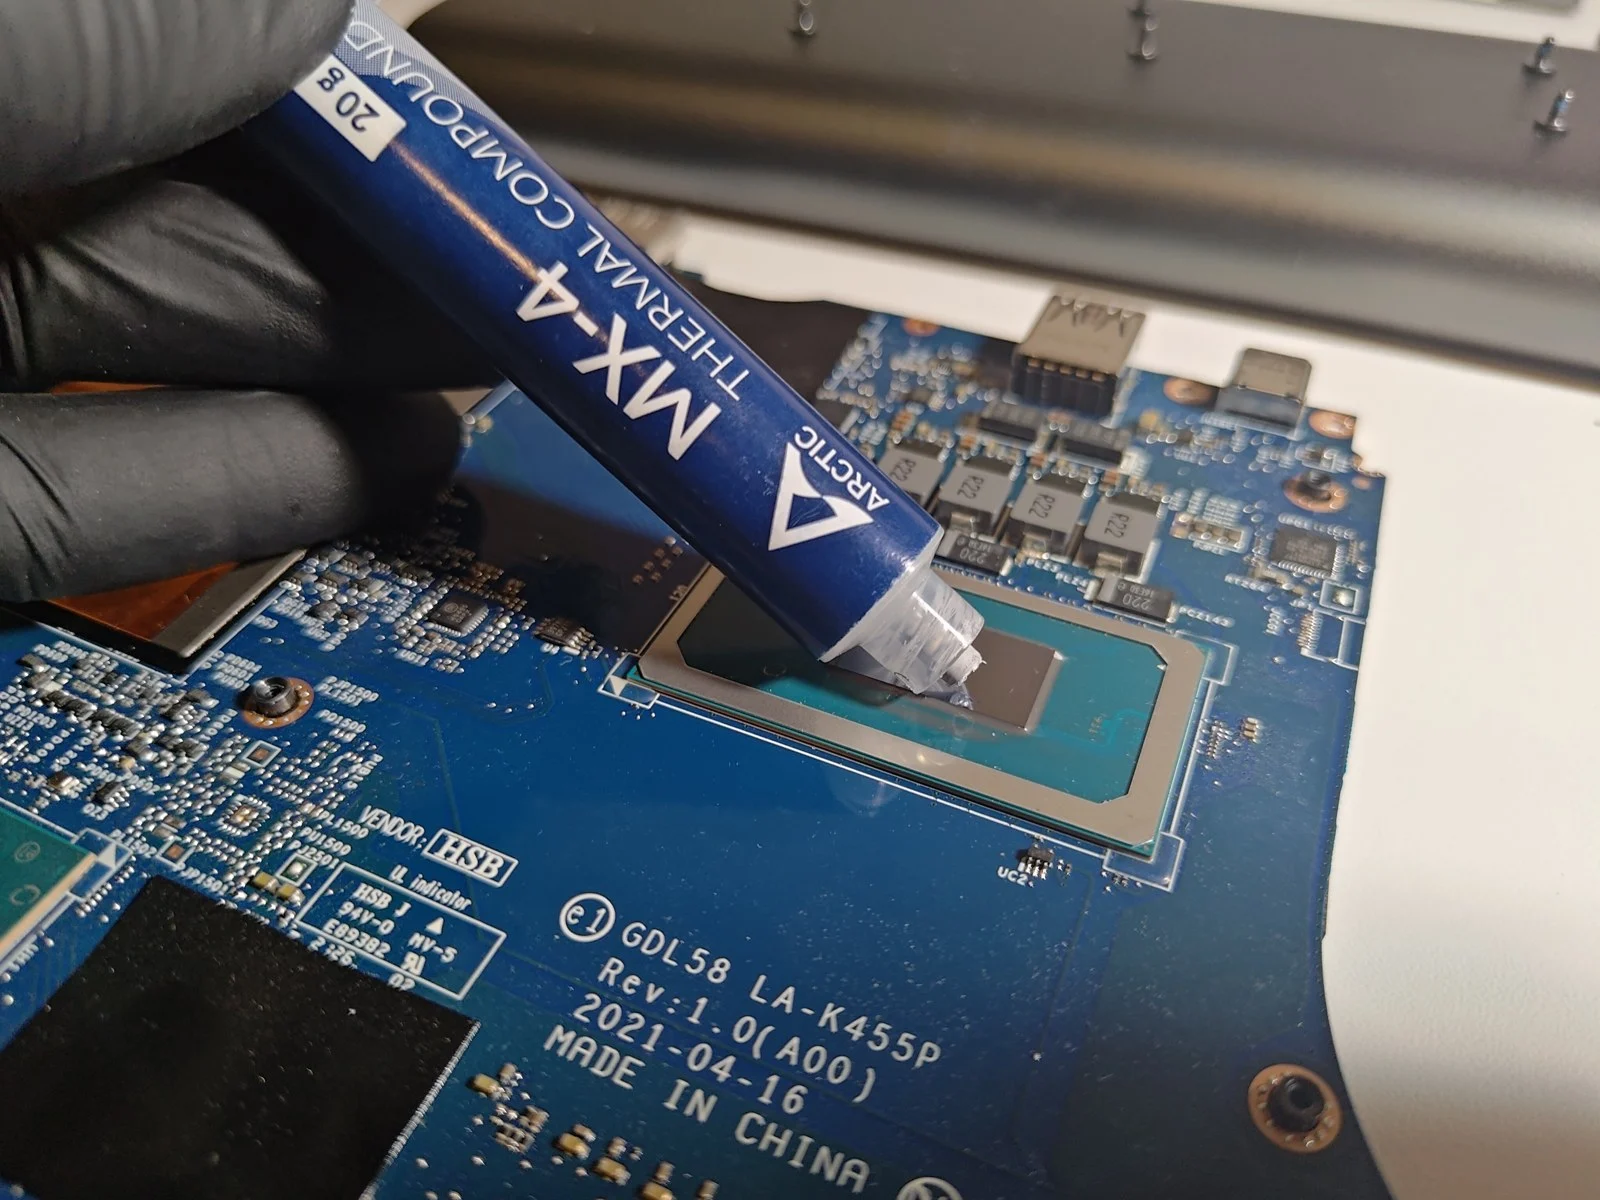
More paste is not automatically better. Its job is to fill the small gap, and correct coverage and heatsink seating matter. The cooler needs to sit evenly, with its screws tightened in the specified sequence. A neatly applied compound cannot compensate for a cooler that is sitting incorrectly.
04 / The detail beside the chips
Why the white and yellow pads need attention too
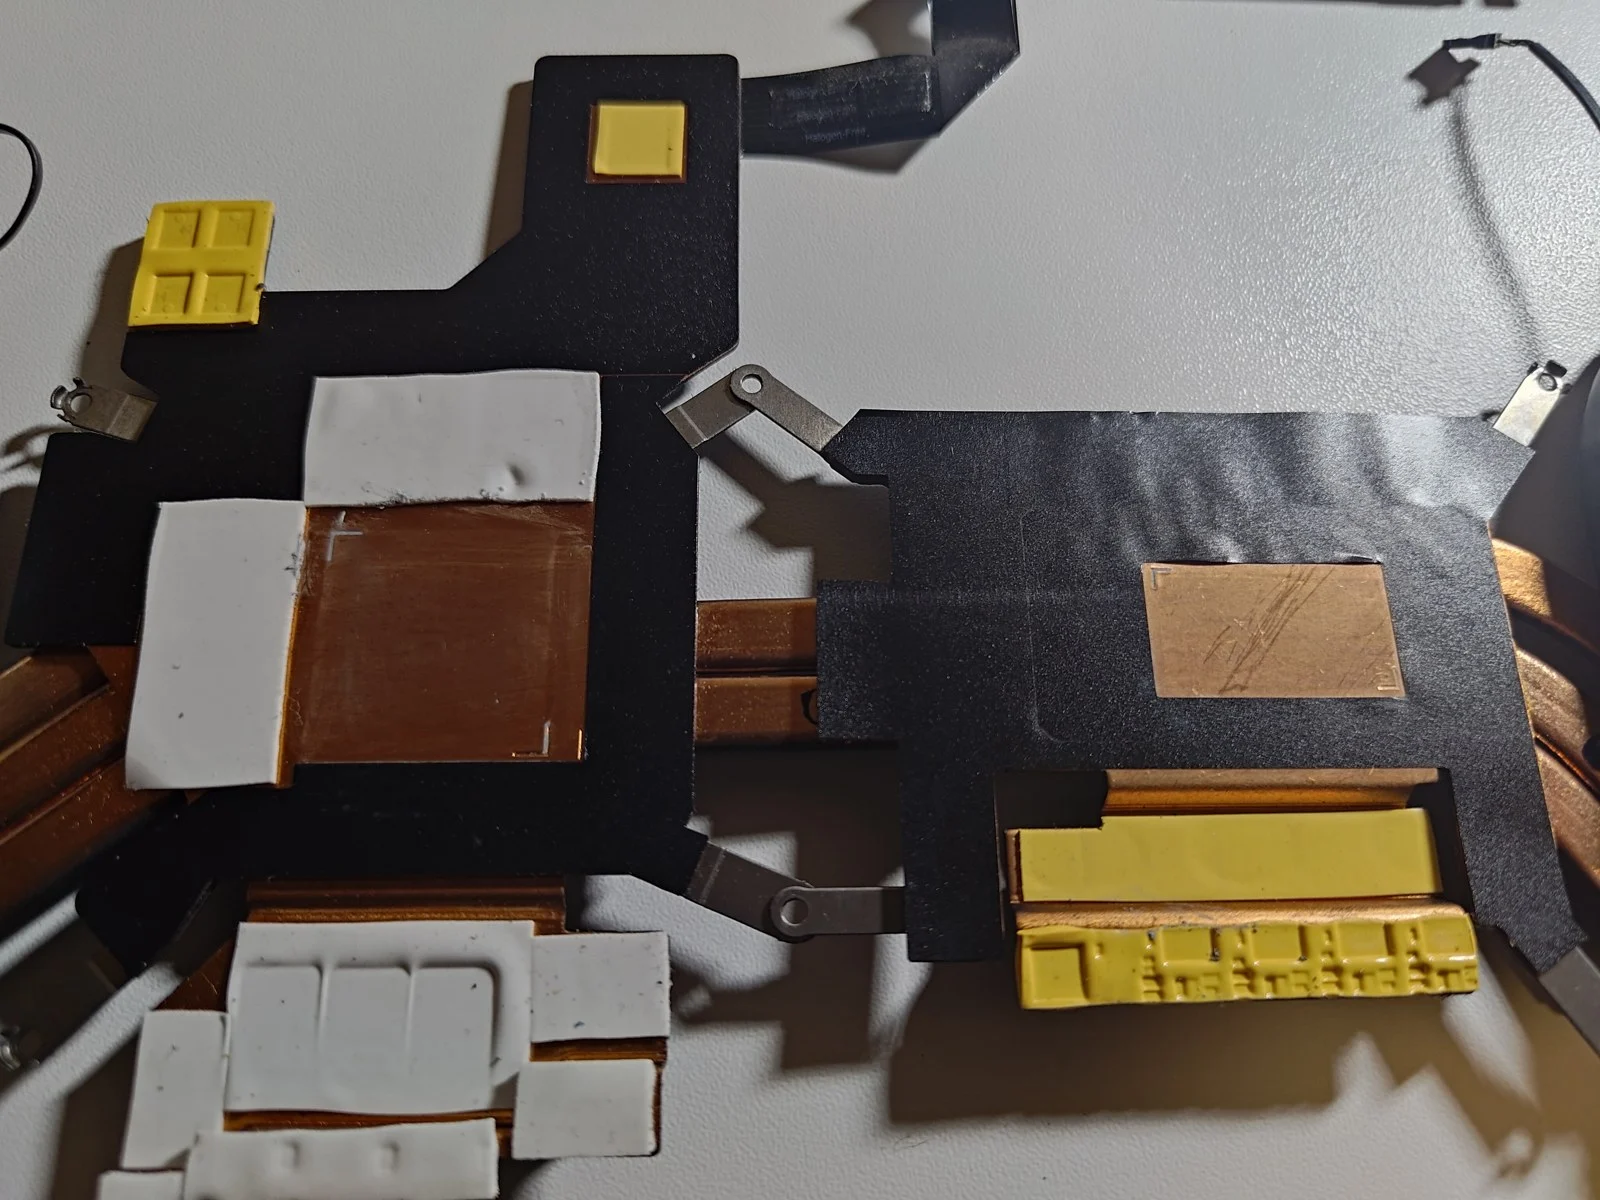
In the heatsink photographs, you will notice white and yellow pads around the copper contact plates. These bridge gaps to other components, such as memory or power circuitry. They are separate from the paste on the CPU and GPU.
This is an easy detail to overlook during a first attempt. Pads can shift or tear when the cooler is lifted. Replacing them with an arbitrary thickness can change how the assembly sits and affect contact elsewhere. Check their condition and position; use the correct specification if replacement is needed.
The cleared heatsink photograph in the gallery is particularly useful here. It shows how the pads surround the chip contact areas. The photo record does not establish that these pads were replaced, so this case study makes no claim that they were.
The engineer’s takeaway
Seeing the fans is only the start. On this G15, cleaning the airflow path and renewing the chip-to-heatsink contact involve different levels of access.
05 / Making a sensible DIY decision
Would I recommend cleaning this G15 yourself?
There is a big difference between brushing loose dust from an external vent and removing the motherboard to reach a heatsink. The paste application is a small part of the work. The careful handling before and after it takes most of the attention.
If you are considering the full job, read the exact service manual first and make sure you are comfortable with battery isolation, static protection, small connector latches and keeping track of different screws. Shut down, unplug the charger and follow Dell’s battery and residual-power precautions before working inside. Never pull a ribbon cable against a closed latch or force a board that still has something attached.
If those steps feel unfamiliar, it is reasonable to stop at external maintenance and arrange a professional laptop cooling-system clean. On this G15, proper repasting involves handling the main board, not simply reaching in beside a fan.
06 / Checking the work
What should be checked after cleaning and repasting?
The visible progress in this job is the removal of the old compound, preparation of the chip and copper surfaces, and application of fresh paste. The photo set also contains temperature-monitoring screens, but it does not provide a clearly matched before-and-after test. I would not use those to promise a particular temperature drop.
For a useful cooling check, compare the same workload, power mode and room conditions before and after servicing. Watch CPU and GPU temperatures, fan behaviour and whether performance holds steady after the laptop has warmed up. A brief desktop reading does not tell you how it behaves halfway through a game.
Reassembly also needs a practical check of charging, keyboard, touchpad, Wi-Fi and any connections disturbed during access. If the machine remains hot, further diagnosis may be needed. Dust and paste are common maintenance concerns, but a failing fan or another hardware fault needs its own repair.
Questions from G15 owners
Dell G15 cleaning and repasting questions
Open a question for a practical answer about this model and the work shown here.
Can I repaste a Dell G15 5511 without removing the motherboard?
For the heatsink access shown here, the motherboard is removed and turned over. Dell's G15 5511 service manual describes that route. Seeing the fans after removing the base cover does not mean the CPU and GPU contact surfaces are accessible.
Is compressed air through the vents enough?
It may dislodge some loose dust, but it cannot remove old thermal paste or let you inspect the hidden contact surfaces. It can also move debris further inside. If cooling problems persist, the full air path and heatsink contact need checking.
Does every loud Dell G15 need new thermal paste?
No. Gaming load and fan settings can produce loud fans without a paste fault. Dust, a worn fan and poor heatsink contact are other possibilities. Diagnosis comes first; when the heatsink is lifted for repasting, the old compound should be removed and renewed.
Should the thermal pads be changed at the same time?
Inspect them rather than replacing them automatically. A pad that is damaged, missing or unsuitable needs attention, but the correct thickness and position matter. The pads and CPU/GPU paste serve different contact areas.
How often should I have a Dell G15 cleaned?
There is no single interval that fits every owner. Dusty rooms, pets and long gaming sessions can increase the need for inspection. Watch for a change from the laptop's usual fan noise, temperature behaviour or sustained performance, and keep the intake clear on a hard surface.
Can you arrange Dell G15 cleaning in the UK?
Yes—send Computer Repair Ltd your exact G15 model, symptoms and postcode through the cleaning enquiry form. An engineer can discuss availability, a suitable repair method and the price before work starts. Workshop access may be appropriate for a model requiring motherboard removal.
UK cleaning enquiries
Want your Dell G15 checked without taking the board out yourself?
If you are in the UK and would rather leave the internal work to an engineer, tell us which G15 you own and what happens during use. Does the fan stay loud after closing a game? Does performance fall once the machine warms up? Those details help us discuss whether a cooling service or further diagnosis is the right next step.
Read about our laptop cleaning service, or use the form to tell us your exact G15 model, symptoms and postcode.
Free to enquire · No obligation to book
The proposed work, price and local options are discussed before you decide to proceed.
A closer look at the work
Dell G15 5511 cleaning and repasting photo gallery
Selected photographs from this job show the fan dust, cooling layout, old paste, prepared surfaces and fresh application. Open an image to examine the details.