Motherboard repair explained – what it is and when it is possible
The motherboard is the main board inside a computer. It links everything together, so power and data can move between the processor, memory, storage, and ports. When people say “motherboard repair”, they often mean different things. Sometimes it is a simple fix around the board, like a loose connector or a damaged charging port. Sometimes it is a proper component-level repair, where individual parts on the board are tested and replaced using specialist tools. And sometimes it means the board is replaced as a unit.
It also helps to set expectations early. Some faults are repairable and worth doing. Others are technically possible but not economical once you factor in time, risk, and the age of the machine. A good repair starts with diagnosis, not guesswork. “Dead motherboard” is a common phrase, but in practice it can mean anything from no lights at all, to a machine that powers on but will not boot, to random crashes that look like software until you test the hardware properly.
What a motherboard does (and why faults look random)
A single board sits in the middle, so one small failure can show up as a totally different problem.
Think of the motherboard as the distribution hub. It is not just a place to plug parts in. It routes power and signals between the CPU (the processor), RAM (working memory), storage, the display output, and all the ports you rely on day to day.
Power is a good example. The charger or PSU feeds the board, then the board steps that power down into several different voltages and sends them where they need to go. These are often called rails, which is just a shorthand for “one of the separate power lines inside the machine”.
If one rail is missing or unstable, the symptoms can look unrelated. A machine might show no signs of life at all. Or it might power on but show no display. Or it could boot sometimes, then crash under load, because the CPU or RAM is not getting clean power. Charging issues can also be board related, because charging is controlled by circuitry on the motherboard, not just the charger itself.
Signals matter too. The motherboard carries high speed data between the CPU, RAM, and storage. It also includes controllers for things like USB, audio, Wi-Fi, keyboard, trackpad, and often the display path. If one controller fails, you might lose a whole group of functions at once, or get odd behaviour like devices dropping out, ports only working at certain angles, or intermittent detection of an SSD.
This is why faults can feel random from the outside. The part that looks “broken” is not always the part that has failed. A black screen could be the display, the cable, the GPU side of the motherboard, or even a power rail that only feeds the backlight. A laptop that will not charge might have a bad charger, a damaged DC jack or USB-C port, or a fault in the charging circuit on the board.
It is also easy to mix up a motherboard fault with a software or OS fault. Software faults tend to be repeatable in a predictable way. Think error messages, failed updates, a PC that boots into Safe Mode but not normally, or problems that disappear if you boot from a clean external drive. Motherboard faults tend to be physical or electrical, so they often show up as instability, sudden shutdowns, no power, no display, or issues that change with temperature, movement, or time.
That said, I do not blame the board without evidence. The sensible approach is to rule out the obvious first: power supply or charger, battery, RAM seating, storage health, and a basic software check. If those do not add up, then it is time to look deeper at the motherboard as the common link.
What “motherboard repair” actually means
It usually means fixing the fault on the existing board, not just swapping the whole thing
People use “motherboard repair” to mean two very different jobs. One is replacing the entire motherboard with another one. The other is repairing the board you already have by fixing the specific failed component. Both are valid. They just suit different situations.
Motherboard replacement is a parts swap. On a laptop it often means stripping the machine down, moving the CPU cooler, and transferring over small items like the Wi-Fi card and speakers. It can be the quickest route if the board is available and sensibly priced. But it is still not a guarantee, because you can fit a replacement board and discover a separate issue elsewhere, like a damaged screen cable, a shorted USB device, or liquid damage in the top case.
Motherboard repair in the strict sense is component-level work. That means we keep the board and replace only what has failed. The aim is to restore correct power and signals, then confirm stability under load. It is slower than a swap, but it can be the better option when boards are expensive, hard to source, or tied to data and firmware configuration.
Component-level repair can include things like:
- Replacing a damaged connector, such as a DC jack, USB-C port, HDMI port, or a ribbon cable socket.
- Replacing a MOSFET (a switching transistor used to control power) that has shorted or gone leaky.
- Replacing capacitors and resistors that have failed or drifted out of spec.
- Replacing an IC (a small chip that performs a control job on the board), including charging and power controller chips.
- Repairing backlight circuit faults, which often cause “screen works with a torch” symptoms even though the laptop seems to boot.
- Reworking solder joints where cracks or lifted pads cause intermittent issues, especially around ports and heavy components.
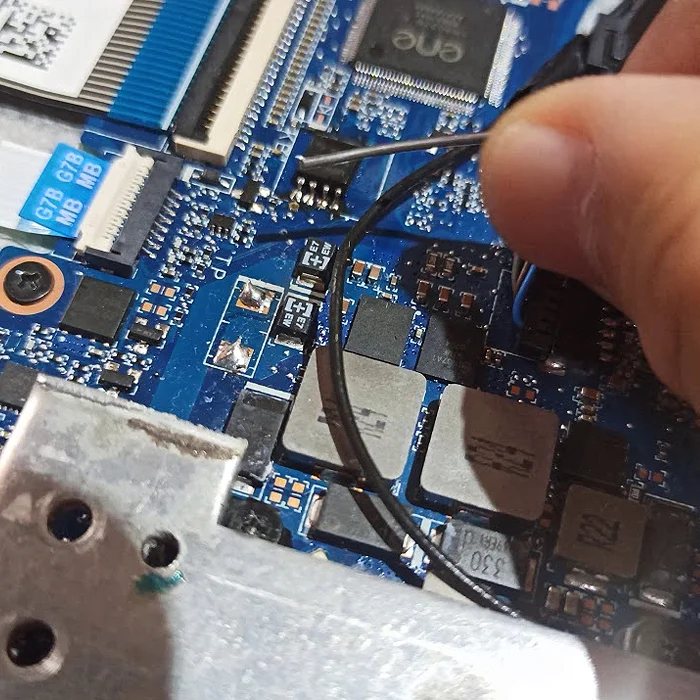
This work is usually done with micro-soldering and rework tools. Micro-soldering means using fine tips, hot air, microscopes, and controlled temperatures to remove and fit tiny parts without damaging the board. It is not the same as DIY soldering with a basic iron. Most motherboard parts are surface-mount and sit close together. Too much heat, the wrong flux, or a slip of the hand can lift tracks off the board, and then the job becomes much bigger.
Crucially, proper board repair is guided by measurement and fault isolation, not guesswork. That can mean checking for short circuits on power rails, measuring voltage behaviour during power on, tracing where a rail stops, and confirming which control signals are missing. Sometimes we use board schematics and a boardview (a map of where components sit) to speed this up, but the core is still the same: test, prove, then replace what is actually faulty.
A practical note if you are running a business: ask whether the shop plans to replace the whole board or repair it, and what evidence they will use to justify that decision. If the answer is vague, I would be cautious. Board work is one area where a disciplined process matters more than confidence.
Common causes of motherboard failure (real-world examples)
These are the usual ways a board gets damaged, and the sorts of symptoms you will notice day to day.
A motherboard rarely “just dies” for no reason. Something normally pushes it over the edge. The tricky part is that the symptom you see is often one step removed from the real fault. A machine that will not charge, keeps crashing, or will not power on can have several different causes on the board.
Liquid damage and corrosion (including delayed failures)
Liquid damage is not only about the moment the spill happens. Even if it “dried out”, liquid can leave minerals behind that slowly corrode tracks and pins. Corrosion is rust-like damage on metal parts. It can take days or weeks to show up as odd behaviour.
Client symptoms I see: random shutdowns, keyboard or trackpad acting up, USB ports failing, Wi-Fi dropping out, charging that works only at certain angles, or a machine that powers on once and then never again. Sometimes it boots fine but the fan ramps up, because a corroded sensor line is reporting nonsense.
Practical advice: if a spill has happened, avoid repeated power-on tests “to check if it is OK”. That is when a wet or contaminated area can short and take out power parts. Get it assessed properly, even if it seems fine for now.
Overheating and long-term thermal stress
Heat is normal. Excess heat over a long period is what causes trouble. The parts that suffer most are usually the power stages (the components that feed the CPU and GPU) and, on some systems, the GPU itself. Thermal stress is the wear caused by repeated heating and cooling.
Client symptoms: the fan is loud all the time, it slows down under load, it crashes during video calls, it blacks out when you open CAD or a game, or it will not stay on unless it is in “low power” mode. Sometimes it works cold and fails when warm, which is a big clue.
Practical advice: if the machine is critical for work, do not ignore a new overheating pattern. Cleaning the cooling system and renewing thermal paste is routine maintenance, and it can prevent a much more expensive board-level failure later. It will not fix everything, but it is sensible if temperatures are clearly out of character.
Power issues: surges, wrong chargers, damaged DC jacks, shorted USB devices
Power faults come from a few places. Surges can get in through the mains adapter, Ethernet, or even USB devices. Wrong chargers are also a real issue, especially with older barrel chargers that look similar but have different voltage or polarity. A damaged DC jack (the power socket) can arc and burn, and that can take out charging circuitry further in.
A shorted USB device is another one people do not expect. “Shorted” means the device is effectively connecting power to ground, like a dead short. That can blow protective components on the board and, in some cases, damage the power rail feeding the ports.
Client symptoms: no charging light, charging only when the cable is held a certain way, machine shuts off when you plug in a dock, ports that stop working after a “pop” or a smell, or a laptop that runs on battery but will not accept power.
Small judgement call: if your charger feels loose, gets hot at the plug, or needs wiggling, stop using it. That is a cheap point to address compared with a burnt charging circuit.
Physical damage: drops, cracked boards, ripped connectors
Drops and knocks can crack solder joints, damage tiny components around the edges, or rip connectors partly off the board. A cracked board is less common, but it does happen, especially if the laptop lands on a corner or flexes hard in a bag.
Client symptoms: it will not turn on after a drop, the screen is dead but you can hear it boot, it only works at a certain lid angle, Wi-Fi disappears, or it cuts out when you move it. Loose internal connectors can look like a “dead” motherboard until you inspect it properly.
Component ageing and manufacturing defects (rare, but happens)
Most boards fail because something happened to them. But components do age, and a small number are simply defective from the start. That can show up early, or later after normal use.
Client symptoms: intermittent faults that slowly get worse, unexplained freezing, failure to wake from sleep, or a system that becomes unstable despite clean software and a known-good power supply. This is where proper measurement matters, because it is easy to mislabel it as “software” until the board finally stops booting.
Previous poor-quality repair attempts
Bad repairs are not always obvious from the outside. I sometimes see damaged pads (the copper landing points parts solder to), missing components knocked off during a “quick fix”, or heavy-handed soldering that bridges pins together. That can create new faults on top of the original one.
Client symptoms: a problem that changed after a repair attempt, a machine that now will not power on at all, or a fault that comes and goes because the underlying damage is mechanical. It also makes diagnosis slower, because you have to work out what is original failure and what is collateral damage.
Practical advice: if a device has been worked on before, tell the repairer and share any notes you have. It saves time, and it helps set realistic expectations about what can be recovered and what is no longer economical.
Signs it might be a motherboard fault (and signs it probably is not)
These symptoms help narrow it down, but proper testing is what stops you paying for the wrong fix.
People often say “the motherboard is dead” when a laptop will not turn on. Sometimes they are right. Often, it is something simpler that sits around the board and fails first.
A motherboard fault usually shows up as a power or communication problem. “Board-level” just means the issue is on the circuit board itself, not a plug-in part like the SSD or RAM.
Symptoms that often point towards a board-level fault include no power at all, no charging light, or a machine that power cycles (tries to start, shuts off, then repeats). A burnt smell is also a big clue, especially if it happened after a surge, a liquid spill, or a new dock or charger. Visible damage matters too, like corrosion, blackened areas, or a connector that has lifted from the board.
Ports are another common one. Intermittent USB devices, charging that drops in and out, or ports that only work when you hold the plug a certain way can be a damaged connector, a cracked solder joint, or a fault on the power rail feeding those ports.
Display symptoms can be misleading, so they need careful wording. No backlight (screen is very dark but you can faintly see an image) can be a backlight circuit issue on the board, but it can also be the screen itself or the display cable. No display with a known-good screen is more suspicious, but even then you still have to rule out the cable, GPU-related faults, and power issues feeding the display circuits.
On the other hand, plenty of problems that feel “serious” are not motherboard problems. Slow performance is usually storage, software, or overheating. Pop-ups and odd browser behaviour are usually software. Driver crashes can be Windows or a device driver issue, and Windows corruption can look dramatic while still being fixable without touching the board.
Boot loops after updates are a good example. The machine may keep restarting or get stuck on a spinning circle, and it is easy to assume the hardware is dying. In practice, this can be Windows repair, a failing SSD, or a configuration issue. It can be the board, but you do not start there.
This is why a good shop will rule out the basics before calling the board dead. That usually means confirming the charger is correct and actually delivering power, checking the battery is not shorted, testing RAM, and checking the SSD. On laptops it also means testing with the screen and cable in mind, and removing external peripherals and docks from the equation.
Practical advice: if the fault started right after you plugged in a new charger, dock, USB device, or monitor, mention it. That timeline is often more useful than the symptom list.
Small judgement call: if you notice a burnt smell, visible scorching, or the device suddenly went dead after a pop, stop trying to “just see if it comes back”. Continued power attempts can turn a repairable fault into a bigger one.
Is a dead motherboard always dead? What “dead” usually means
Most “dead board” reports are really a set of testable symptoms, and a few of them are recoverable with the right diagnosis.
When someone says “the motherboard is dead”, they usually mean the laptop or PC is not usable. That is fair. But as a repair description it is too vague to be helpful.
In practice, we split it into a few common patterns. Each one points to different parts of the system, and some have a much better chance than others.
No power at all is the classic “dead” report. No lights. No fan twitch. Nothing. That can be a failed charger, a shorted battery, a damaged DC jack, or a short circuit on the motherboard.
No charging is slightly different. You may get a power light when the charger is plugged in, but the battery will not charge, or the charging light never comes on. This can be the charger and cable, the charging port, or the charging circuit on the board.
Powers on but no display means you get lights and fans, but nothing on the screen. Sometimes you also get keyboard backlight or Caps Lock response. This can be display related (panel or cable), memory related, or a board issue affecting the graphics or the power rails that feed the display circuits.
No boot but fans spin is common on laptops. The machine “looks alive” but never reaches the logo screen or Windows. This can be RAM, SSD, firmware settings, corrupted BIOS, or a board fault that stops the CPU from initialising properly.
Shuts down under load is a different beast. It may run for a while, then die when you open a heavy spreadsheet, start a game, or join a video call. Overheating is the obvious cause, but power delivery faults on the motherboard can do it too, especially when a component draws extra current.
One reason a “completely dead” machine can still be repairable is a short circuit on a power rail. A power rail is just a specific voltage line feeding a part of the board. If a component on that rail shorts, the laptop can refuse to start at all because the protection circuits detect a problem and stop power-up.
From the outside, that looks identical to a dead motherboard. Inside, it can be one failed capacitor, a shorted USB power controller, or damage around the charging area. Whether it is repairable depends on what is shorted, how much heat damage there is, and how much time it takes to find it safely.
Firmware issues can muddy the water as well. BIOS or UEFI firmware is the low-level code that starts the machine before Windows loads. A corrupted BIOS can cause no boot, black screen, or power cycling, and it can look like hardware failure. On some systems it can be recovered by reprogramming the chip or using a built-in recovery method.
But firmware is not a magic explanation for everything. If there is no power draw at all, clear signs of liquid corrosion, a burnt area on the board, or a hard short that shuts the power rail down instantly, a BIOS update will not fix it. Equally, if it only fails under load, firmware is rarely the main suspect.
It is also worth knowing that many board faults are progressive. They start intermittent. Charging drops in and out. It only boots after the second try. It freezes once a week, then every day. Eventually it stops entirely. That pattern often points to heat stress, cracked solder joints, or a component that is breaking down over time.
Practical advice: note the exact behaviour and the timeline. “No power” is useful, but “no power unless the charger is wiggled” or “shuts off when I open Teams” is far more diagnostic. If it failed after a spill, a surge, or a new dock or charger, mention that too.
Small judgement call: if the machine is truly dead or keeps power cycling, avoid repeated power attempts. If there is a short on a rail, each attempt can add heat and turn a contained failure into board damage that is harder to repair.
When motherboard repair is possible (and when it is not)
Clear boundaries help you decide whether it is a sensible repair, not just a technically possible one.
Motherboard repair usually means finding and fixing the specific point of failure on the board, not replacing the whole thing. Sometimes that is straightforward. Sometimes the board is effectively beyond sensible repair because the damage is too widespread, too deep, or the parts are not realistically available.
Some faults are genuinely repairable because they are localised. A common example is a shorted component. That is when one failed part drags a power line down and the machine refuses to start. If the short is on an accessible rail and the surrounding board is intact, replacing the failed part can bring the system back.
Failed charging or power control ICs are another repairable category. An IC is just a small chip that controls power, charging, or switching. When one fails, you can see symptoms like no charging, power cycling, or shutdowns under load. If the pads and surrounding copper are still solid, this sort of repair can be viable.
Ports and connectors are often good candidates too. Damaged charging ports, loose DC jacks, worn USB sockets, and broken display connectors can all mimic deeper board faults. If the damage is limited to the connector and the board around it has not been torn up, repair is usually practical. If the connector has ripped pads off the board, it becomes more marginal and sometimes needs track repairs as well.
Certain backlight and power stage faults can also be repairable. The backlight is the light behind the screen. The power stage is the part of the board that converts and feeds power to major components. If the fault is in a discrete section and not tied to deeper internal layers, it can often be diagnosed and fixed without touching the rest of the board.
Liquid damage sits in the middle. Corrosion that is caught early and has not destroyed pads or tracks can sometimes be cleaned and stabilised, then repaired where needed. Pads and tracks are the copper contact points and the thin copper lines on the board. Once corrosion has eaten those away, the job becomes reconstruction, not repair, and reliability is harder to guarantee.
On the other side, some scenarios are often not viable in a sensible way. Severe corrosion under large chips, especially BGA chips, is a big one. BGA means the chip is soldered with an array of tiny solder balls underneath, so you cannot properly see the damage until it is removed, and by then the board can be too far gone.
Multi-layer internal damage is another limiter. Motherboards are not a single sheet. They are several layers pressed together, with power and signal routes inside. If an internal layer is burnt, delaminated, or shorted, you can spend a lot of time chasing a fault that cannot be accessed or made reliable again.
Cracked boards are also a problem, especially cracks that go through inner layers. You might see it after a drop, a flex, or pressure near a hinge area on a laptop. You can sometimes repair a visible break, but if inner layer connections are fractured, faults can remain intermittent and come back later.
Then there are cases where the limiting factor is parts, not skill. Some chips are unobtainable through normal supply channels, or effectively locked down to the original board. Even if you can remove and replace them, sourcing a known good part can be the hard bit. In those cases, the best engineering in the world does not help if the part simply cannot be replaced with confidence.
Previous repair attempts matter as well. Repeated rework damage can lift pads, overheat the board, or leave poor solder joints that fail again. If a board has been worked on several times and the area is already compromised, it can turn a clean repair into something risky and time-consuming.
Desktop and laptop motherboards also differ in what makes financial sense. On desktops, many faults can be isolated by swapping separate parts: graphics card, RAM, power supply, even the board itself, without touching tiny components. Laptops integrate far more onto the board, so a charging fault, power fault, or graphics problem often lives on the motherboard and cannot be bypassed with a simple part swap.
Practical advice: judge the board on condition as much as symptom. If you have had a spill, visible corrosion, or the machine has been opened and reworked elsewhere, mention it upfront. It changes what is realistic. Small judgement call: if the device is business-critical, it is often worth asking for a diagnostic first and making a repair decision based on what is found, rather than committing to board work blindly.
Is it worth repairing? How to decide
Use a simple framework: what the machine is worth to you, what the fault is likely to involve, and what outcome you actually need.
Motherboard repair decisions are rarely about the board on its own. They are about the value of the device, the risk of the specific fault, and the cost of being without it. For a business, downtime and data usually matter more than the technical details.
I normally start with value factors. How old is the device? Is it already near the end of its useful life, or still a good fit for your work? What would a like for like replacement cost in today’s market, not just any replacement? And does it still meet your performance needs for what you do day to day?
Then consider business downtime. If this is the only machine that can run a specific workflow, the cost is lost time, not just parts. If you have spares, loan machines, or cloud access to your work, you can afford to be more selective and avoid higher risk repairs.
Data importance is its own category. A non-booting laptop with critical data inside may justify board work even if you plan to replace the device afterwards. In some cases the best outcome is simply getting the data back reliably, not restoring the laptop to daily service.
Sentimental value counts too. People do keep machines because they trust them, they have specialist software set up, or they have a reason that is not purely financial. That can tip the decision towards repair, as long as you accept the risk level of the fault.
Next are the risk factors. A liquid damage history is a big one, even if the machine dried out and worked for a while. Corrosion can continue under components and cause failures later. Corrosion means metal and copper have been chemically eaten away, which makes repair less predictable.
The extent and location of corrosion matters. Light residue around an edge connector is very different from corrosion under dense chips in the middle of the board. If the damage is under major chips, it can become a deeper rebuild rather than a clean repair, and long-term reliability is harder to judge.
Prior repair attempts also change the picture. Reworked boards may have lifted pads, damaged tracks, or heat-stressed areas. Pads are the small copper contact points that components solder to. Once they are gone, you are not just fixing a fault, you are rebuilding connections.
Intermittent faults are another risk. If the problem comes and goes, diagnosis takes longer and the repair can be less certain because you have to catch it in the act. Intermittent issues are often linked to cracked solder joints, flex damage, or borderline components.
From there, pick the outcome that matches your real goal. You usually have four options: repair the existing motherboard, replace the motherboard, replace the whole device, or recover data only. Choosing the right one is often about reducing risk, not chasing the most technically impressive fix.
Repairing the existing motherboard makes sense when the fault is in a contained area and the board is in good condition. It also makes sense when configuration matters, like a high-end laptop or workstation with a lot of RAM, a specific GPU, or a business setup you do not want to rebuild from scratch.
Replacing the motherboard can be the cleaner choice when a known good board is available and the original has multiple issues. It can also reduce uncertainty after severe liquid damage, because you are not relying on a board with hidden corrosion. The trade-off is that board availability and compatibility can be limiting, especially on laptops.
Replacing the device is often the sensible call for low-value machines or older systems that were entry level to begin with. If the laptop was already slow for your work, a motherboard repair does not change that. You get a working machine, but it still struggles, and that is not a good business outcome.
Data recovery only is a valid endpoint. If the machine is not worth keeping, or the board is too risky, the priority can be extracting data and getting you back up and running on something else. This is also the least emotional option when time matters.
One small judgement call that helps: if the device is central to your business and you rely on it daily, pay for a proper diagnosis first and decide after you know what has actually failed. Committing to a repair before the fault is identified usually leads to the wrong spend, whether that is repairing too much or replacing too soon.
What a proper diagnosis looks like in a repair shop
This is the step-by-step process that turns guesswork into a repair plan, and it is why a quick opinion is often wrong.
A good diagnosis is not one test. It is a chain of checks that narrow the fault down from “won’t turn on” to a specific cause. That takes time because most failures look the same at first. No power, no image, no charging. The details matter.
We normally start with an initial inspection before we apply any power. Liquid indicators are checked first. They are small stickers that change colour if they have been wet, but they are not perfect, so we treat them as a clue, not a verdict. We also look for burns, heat marks, and anything that smells like overheated electronics. Smell sounds basic, but it often points you towards the area that failed. Connector damage is next. Loose charging ports, bent pins, cracked sockets, and torn flex connectors can cause the same symptoms as a dead motherboard.
After that comes controlled power testing. The first question is whether the board has a short. A short is an unintended low-resistance path that makes power collapse or components overheat. We check how the machine behaves when power is applied, including current draw behaviour. Current draw is simply how much power the board tries to take. A dead short looks different to a board that is trying to start but failing part way through. We also verify key voltage rails. Voltage rails are the main power lines inside the device, each feeding a different subsystem.
Before blaming the motherboard, we do isolation steps with known-good parts and simple external checks. A known-good charger matters because a weak or wrong charger can mimic a charging fault. Same for the battery on many laptops. We will also test with and without RAM where possible, and with a known-good SSD or by removing the SSD to see if the boot behaviour changes. External display checks are part of this too. A “dead” laptop sometimes has a working motherboard and a failed screen, backlight, or display cable. For a business user, this step is about avoiding the wrong repair and the wrong bill.
If those checks still point to the board, we move into board-level testing. That means measurements first, before any rework. Rework is physical soldering work on the board, and once you start it you can change the evidence. So we measure signals and power behaviour around the suspicious area and confirm what is missing or abnormal. On some faults the goal is to prove a specific component has failed. On others it is to prove the failure is inside a major chip, which can change whether repair is practical.
Only when we have a clear direction do we talk about doing major work. The findings should be explained in plain terms, with options. For example: repair the charging circuit, replace the DC jack, replace the motherboard, or shift to data recovery. You should also be told what is known, what is suspected, and what risks remain, especially after liquid damage or previous repair attempts.
One judgement call that helps in real life: if someone offers a confident diagnosis without seeing the machine, or after a one-minute look at the symptoms, treat it as a guess. Symptoms are not a fault. A proper diagnosis should leave you with a specific explanation and a decision point before any irreversible work starts.
Data recovery considerations when the motherboard has failed
What happens to your files, and what can still be done when a full repair makes no sense
When someone says “the motherboard is dead”, the next worry is usually the data. In most cases your files are not on the motherboard. They live on the SSD or HDD (the storage drive). That is good news because the board can fail and the drive can still be fine.
The main exceptions are when the storage is soldered to the board, or when encryption ties the data to the machine. Encryption means the data is locked with a key, so even a healthy drive may not be readable without the right key and supporting hardware.
If the SSD or HDD is removable, recovery can be straightforward. We can usually test the drive on known-good hardware and see if it is detected and stable. If it is healthy, we can copy the data or help you move it onto a replacement machine. This is often faster and cheaper than motherboard-level work, which is why we look for this route early.
Where it gets harder is soldered storage. Many modern laptops use storage chips that are part of the motherboard assembly. In that case you cannot just “take the drive out” and plug it into something else. There are specialist options, but it can turn into a motherboard repair job purely to get the data, even if the laptop itself is not worth restoring long term.
Encryption can also force the same decision. Some systems use hardware-backed encryption or security chips that store or protect the key. If that part of the board is damaged, the data can be effectively inaccessible until the board is repaired enough to authenticate and unlock it. That does not mean it is impossible, but it does mean the approach changes from “copy files from a drive” to “stabilise the original machine long enough to access the data”.
One thing that often makes outcomes worse is repeated power-on attempts. A damaged board can have corrosion from liquid exposure, and corrosion spreads when current is applied. A board can also have a short circuit (an unintended low-resistance path) that overheats parts every time you try to start it. Each attempt can turn a clean, localised fault into wider damage, and that can reduce data recovery options.
Practical advice: if the machine has had liquid damage, a burning smell, or it suddenly went dead and now shows odd behaviour (clicking, cycling power, getting hot near the charger), stop testing it. Get it assessed with data recovery in mind, not just “make it turn on”. A careful first diagnosis can keep the data path open, even when the laptop itself is not economically repairable.
Finally, set expectations. Data recovery is a goal, not a promise. The sensible plan is to identify where the data lives, check whether the storage is removable and readable, and only then decide whether a motherboard-level repair is justified purely for access.
How to prevent motherboard damage
A few low-effort habits that cut risk, even when failures are just bad luck.
Most motherboard faults are not caused by anything you “did wrong”. Parts age, manufacturing varies, and accidents happen. But there are a handful of practical habits that reduce the common risks without turning your laptop into a project.
Liquids are the big one. If you spill anything, power off straight away. If it is a laptop, hold the power button until it shuts down if needed. Then stop charging it. Do not keep trying to boot it “to check if it is fine”. Every power-on attempt can push liquid or corrosion into places it was not yet affecting.
If you can, disconnect any external devices. Turn the machine upside down in a tent shape so liquid can drain away from the keyboard area. Then get it assessed. Drying time alone is not a repair, because residue can stay behind and cause later failures even if it seems to work at first.
Keep cooling clear. Heat is a slow, quiet way to stress a motherboard over time. You do not need a strict cleaning schedule, but do pay attention to changes. If the fan suddenly gets louder, runs constantly, or you feel the case getting hotter than usual, treat that as an early warning. Often it is just dust build-up or a tired fan. Sometimes it is dried thermal paste.
Thermal paste is the material between the processor and the heatsink that helps move heat away. It does not need replacing “because it has been a year”. It does make sense when the machine is overheating, throttling, or being opened anyway for another repair.
Use the correct charger and avoid damaged cables. Cheap or incorrect chargers can deliver unstable power. Frayed cables, loose plugs, and bent pins can cause arcing and heat, especially around the charging port. If the charger only works when the cable is held at a certain angle, stop using it. That is a small problem that can turn into a board-level charging fault.
Be gentle with ports. USB, charging, and video ports are soldered to the motherboard on many laptops. Yanking a connector sideways can crack solder joints or lift pads from the board. Plug and unplug straight, support the machine with your other hand, and avoid using the cable as a handle. If you regularly dock at a desk, a small judgement call that helps is using a short extension lead or a hub so the wear happens on the cheaper part, not the laptop.
Backups are the real safety net. Even perfect handling does not prevent every failure. For a business machine, having an automatic backup to cloud storage or an external drive matters more than any cleaning routine. It turns a hardware failure into an inconvenience, not a crisis. If you are not sure what is being backed up, it is worth checking now rather than when the laptop will not power on.
FAQ
Words from the experts
We often see the same pattern: a machine that “just died”, then a second power attempt, then odd behaviour that comes and goes. A common problem is assuming the board is dead when it is really one failed rail or a short pulling everything down. In practice, we start by taking voltage and resistance measurements on the power rails.
If the fault is stable and localised, motherboard repair can be a sensible option. If the damage is widespread, intermittent, or involves heavy corrosion under chips, it can turn into a long chase with a less reliable end result, and replacing the board is sometimes the more practical call.