Thermal paste replacement explained – when cleaning is not enough
You clean the vents. You clear the computer fans dust. The fans spin properly again. But the laptop still runs hot, the fan stays loud, or performance drops under load. That is a common one in the workshop. Cleaning improves airflow, but it does not fix how heat moves from the processor to the metal heatsink. That part relies on thermal paste (a thin compound that fills tiny gaps) and on the heatsink being clamped down with the right pressure.
This article explains what thermal paste actually does, how and why it can dry out over time or heavy use, and why temperatures can stay high even after a good internal clean. It is aimed at helping you make a sensible call on when repasting is worth doing, and when the overheating is likely coming from something else. Diagnosis first, not guesswork.
What thermal paste actually does (and what it cannot do)
It is there to help two solid surfaces share heat properly, not to “cool” the chip by itself.
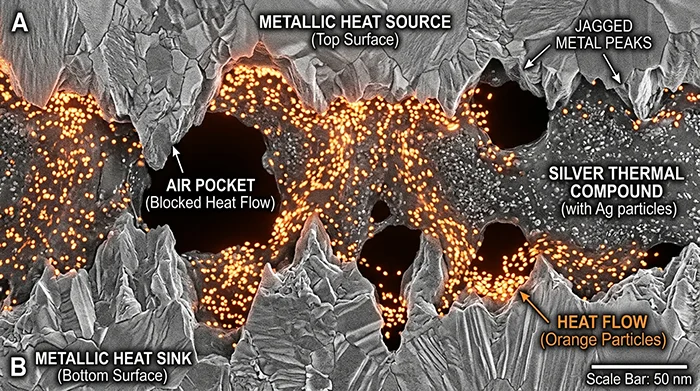
Thermal paste sits between the top of the processor (or graphics chip) and the metal heatsink. Those two surfaces look flat, but under a microscope they are not. Thermal paste fills microscopic gaps between the chip and heatsink so they can make better thermal contact.
The key point is air. Air is a poor conductor of heat, so little trapped pockets of air act like insulation. Thermal paste improves heat transfer by removing those insulating air pockets, letting heat move into the heatsink and then out to the fins and fan.
Thermal paste is not a glue. It should not be used to compensate for a bent heatsink, a warped bracket, or missing screws. If the heatsink is not being clamped down evenly with the correct pressure, the paste cannot “make up the gap” in any reliable way. In the workshop, when I see uneven screw tension or a heatsink that rocks slightly, I fix that first before thinking about paste.
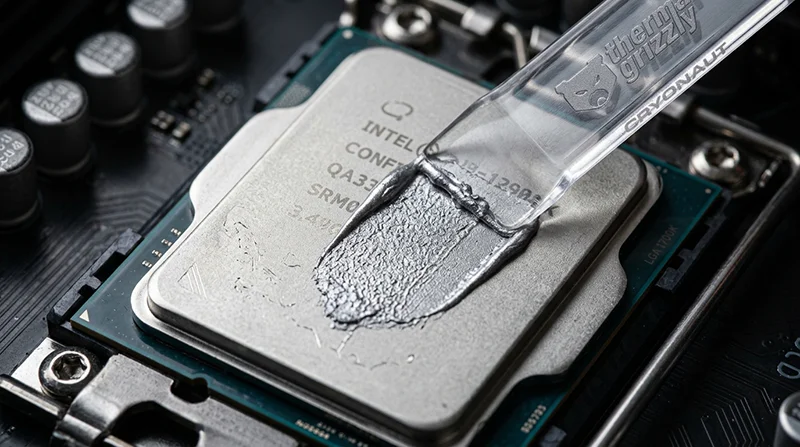
More paste is not better. The goal is a thin, even layer that allows metal-to-metal contact as much as possible. If you apply too much, you can actually create a thicker barrier that makes heat transfer worse, and it can squeeze out around the sides. Correct application is about contact, not thickness.
It also helps to know the difference between thermal paste and thermal pads. Paste is used on the main chip surface where the heatsink sits directly on top. Thermal pads are soft, pre-cut sheets used to bridge a gap, often on VRAM (graphics memory) and VRM (power delivery components) on many laptops and graphics cards. Pads come in specific thicknesses, and getting that thickness wrong can stop the heatsink from sitting properly on the processor, which then causes high temperatures even with fresh paste.
Practical judgement call: if a device uses pads as well as paste, I treat it as a “measure and replace like-for-like” job rather than a quick repaste. It is easy to improve one contact point and accidentally ruin another if you do not check the whole heatsink assembly.
How and why thermal paste dries out or stops working
These are the real failure modes I see on the bench, not just “it goes bad”.
Thermal paste does not usually fail all at once. It slowly stops doing its job, which is to fill tiny gaps and keep good contact between the chip and the heatsink. When that contact degrades, temperatures climb, fans stay noisy, and performance drops under load even if the vents and fan are clean.
One common mechanism is the pump-out effect. That is where the paste gets pushed out from between the chip and heatsink over time due to repeated heating and cooling cycles. Every time a laptop goes from cool to hot and back again, the materials expand and contract at slightly different rates. Over thousands of cycles, the paste can migrate away from the centre, leaving a thinner patch or even a bare spot where you need paste the most.
Another one is simple drying and hardening with time, especially in hotter-running systems. Thin laptops, gaming machines, and workstations that spend a lot of time under sustained load tend to cook the compound harder. The paste can lose its oils, go stiff, and stop conforming to the microscopic surface texture. It might still be there, but it no longer “wets” the surfaces properly, so heat transfer gets worse.
Contamination is also real, and it is often missed. Dust does not usually get between the chip and heatsink on its own because that joint is clamped tight, but it can get introduced during previous work. I see paste that has picked up fine debris, nicotine residue, or old compound that has been smeared around and reused. Once you mix paste with grime, you change how it spreads and how it conducts heat. It can also create uneven pressure points when the heatsink is tightened down.
Poor original application is another cause, even on some factory builds. Too little paste, an uneven spread, or paste missing part of the die (the actual chip surface) can leave an area insulated by air. Modern laptop CPUs and GPUs can be physically small, so being a few millimetres off matters. I have opened machines where the paste blob sat to one side and the opposite corner of the chip was almost dry from day one.
When people say “the paste was dry”, this is what it often looks like during a repair. It can be chalky and pale, like dried filler. It can be cracked, with little lines through it. Sometimes the heatsink is stuck down and needs careful twisting to break the seal, because the compound has hardened like putty. Those are good signs the paste is no longer behaving like a soft interface material.
Practical advice: if a machine runs hot after a proper internal clean, and you can see it throttling under load (slowing itself down to protect the chip), repasting is a sensible next step. But it is only sensible if the heatsink assembly is sound and tightened correctly, and any thermal pads are checked at the same time. A quick “paste swap” without checking the whole contact stack can make things worse.
Time-based vs usage-based failure: when paste tends to become a problem
Think about how the machine lives day to day, not a calendar reminder.
Thermal paste can be fine for years, or it can become a bottleneck surprisingly early. It depends less on a neat schedule and more on heat, pressure, and how often the machine is pushed.
Time still matters, even if a PC is not heavily used. Paste is a mix of solids and oils. Over time those oils can separate or dry out, and the compound can stiffen, even if the computer spends most of its life doing emails and invoices.
Usage matters more when the system runs hot for long periods. Gaming laptops, mobile workstations, and small desktops with high sustained load are the usual candidates. Long rendering jobs, big spreadsheets that hammer the CPU, or hours of video calls on a thin laptop can keep the cooling system near its limit. That constant heat cycling is what encourages pump-out and loss of contact.
Environment can tip it over the edge. High ambient temperatures make the whole cooling system start from a worse place, and a blocked intake makes it work harder again. An intake is simply the vent where the fan pulls air in. If it is sitting on fabric, pushed against a divider, or clogged with dust and fluff, the paste and the rest of the thermal stack get cooked more often.
On some laptops, frequent travel can also play a part. Regular flexing in a bag, being carried one-handed, or repeated knocks can affect heatsink seating over time. It does not happen to every model, but I do see machines where the screws are tight and the paste is new, yet contact is still uneven because the assembly is not sitting flat any more.
Previous overheating events matter too. If a machine has been running at high temperature for a while because the fan was jammed, the vents were blocked, or it was used on a duvet, that extra heat can bake the paste faster. Even after you clean the laptop dust out, the paste may already have hardened or pumped out enough that it cannot recover.
Practical way to think about it: if a business laptop is mostly docked, used lightly, and stays quiet, repasting is rarely urgent. If it is thin, runs hot, travels a lot, or has a history of noisy fans and throttling, paste moves up the list. In those cases I would rather assess temperatures under load and inspect the heatsink contact than replace paste on principle.
Why temperatures can stay high even after cleaning
Cleaning improves airflow, but the next checks are about heat transfer and control
An internal clean is still worth doing. It removes dust mats and fluff that block vents and choke fans. That restores airflow. But airflow is only half the cooling system.
If temperatures stay high after a proper clean, the remaining bottleneck is often how well heat is moving from the chip into the heatsink. The CPU and GPU are the heat sources. The heatsink is the metal assembly that carries that heat to the fins where the fan can remove it.
Cleaning restores airflow; it does not fix poor contact between chip and heatsink. If the contact surface is uneven, or the interface material has hardened or pumped out, the heat cannot get into the heatsink efficiently. The fan can be working hard, but it is trying to cool a heatsink that is not receiving heat properly.
Heatsink contact pressure and the screw torque pattern matter. Many laptop heatsinks use spring screws and a numbered tightening order. That sequence is there for a reason. If one corner is tightened too much first, the heatsink can sit slightly skewed and create a hot spot. Even a small tilt can raise temperatures under load.
In practice, after cleaning I check the mechanical side next. Are the screws present and the right length? Are the threads intact? Is the heatsink sitting flat? Has the bracket been bent by a previous repair? These are boring details, but they decide whether the cooling stack is actually making contact.
A fan can also spin and still underperform. Worn bearings can let the fan wobble and lose efficiency. Cracked or missing blades reduce airflow. Some fans ramp up loudly but move less air than they should, which looks like “overheating even though the fan is on”. The quick test is not just “does it spin”, but “does it move strong air through the fins”.
Heatpipe issues can mimic bad thermal paste. A heatpipe is a sealed tube that transfers heat from the chip area to the fin stack. If it loses performance or has an internal failure, the heatsink may stay oddly cool while the CPU or GPU temperature shoots up. In other words, the heat is not travelling, so replacing paste alone will not change much.
Thermal pads can also cause trouble, especially in tighter laptop designs. A thermal pad is a soft spacer used to bridge a gap to components like VRAM or power parts. If a pad is out of position, too thick, or has shifted, it can hold the heatsink off the CPU or GPU in some designs. That is one reason I treat a repaste as a full contact inspection, not a quick swap.
There are also firmware and software factors that can look like cooling issues. Firmware is the low-level code that controls things like fan behaviour and power limits. Software is your operating system and apps. A machine running a constant background load will run hot even with perfect cooling. Common culprits are indexing, cloud sync, a stuck update, or a browser tab chewing CPU.
I do not blame software for everything. But I do rule it out properly. The practical check is to watch CPU usage at idle, then test under a known load while monitoring clocks and temperatures. If the CPU is pegged at high usage when you are “doing nothing”, cleaning and repasting will not fix the root cause. If the load is normal but temperatures spike fast and the system throttles, that points back to contact, the fan, or the heatsink assembly.
A small judgement call that saves time: if temperatures are high at idle after cleaning, look for background load and fan control issues first. If idle is fine but it overheats quickly under any real work, focus on heatsink contact, pads, and the heatpipe before assuming paste is the only answer.
Symptoms that point to thermal paste being the likely cause
These are the patterns I look for when the cooling system is clean but heat still is not getting out of the chip properly.
Thermal paste sits between the CPU or GPU and the heatsink. It fills tiny gaps so heat can move into the metal. When it dries out, cracks, or pumps out from repeated heating and cooling, heat transfer gets worse even if the fan and vents are clean.
One sign is fast temperature spikes under light load. You open a few browser tabs, start a Teams call, or launch a simple app and the temperature shoots up in seconds. That rapid jump usually means the chip is making heat but it is not getting into the heatsink efficiently, so the sensor climbs before the fan has any chance to stabilise it.
Another common pattern is throttling soon after starting a game or a render, despite clean vents. Throttling is the system deliberately slowing the CPU or GPU to stop damage. If the machine is clean, the fan ramps, and it still hits its limit quickly, the weak link is often the contact layer between chip and heatsink.
Watch what the fan is doing too. If the fan ramps hard but temperatures barely drop, that suggests the heatsink is not receiving heat properly. The fan can only remove heat that has actually made it into the fins. A loud fan with stubborn temperatures is often a heat transfer problem, not an airflow problem.
I also pay attention to whether one core or one chip runs unusually hotter than expected in the same system. For example, the CPU is hitting high temperatures while the GPU stays fairly normal, or one CPU core is consistently much hotter than the others under the same workload. That can happen when paste coverage is uneven, the heatsink is slightly tilted, or pressure is not even across the chip.
A more subtle sign is when temperatures improve briefly after a restart, then worsen again under sustained load. A restart clears background load and resets fan behaviour, so things can look better for a short time. If it still gets hot again once the work continues, it points back to the system struggling to move heat out steadily.
One practical judgement call: do not rely on a single temperature number from one app. Use the pattern instead. If you see quick spikes, early throttling, and a fan that cannot pull temperatures down, that is enough to justify an internal inspection of the heatsink contact and paste condition, not just another external clean.
When should thermal paste be replaced (a sensible decision process)
Use this to decide when a repaste is justified, when it is simply sensible, and when it is unlikely to change anything.
Thermal paste is not something I replace on a schedule. I treat it as a fix for a specific problem, or a sensible extra step when the machine is already apart.
A repaste is justified when the device is still overheating or throttling after you have confirmed airflow is good. That means vents are clear, the fan is actually spinning up under load, and the heatsink fins are not blocked with dust felt. Throttling is the system slowing itself down to avoid heat damage.
If the fan ramps up loudly but temperatures barely move, that is often when paste and contact become the next thing to check. The fan can only cool the heatsink. It cannot pull heat directly out of the CPU or GPU if the heat is not getting into the metal properly.
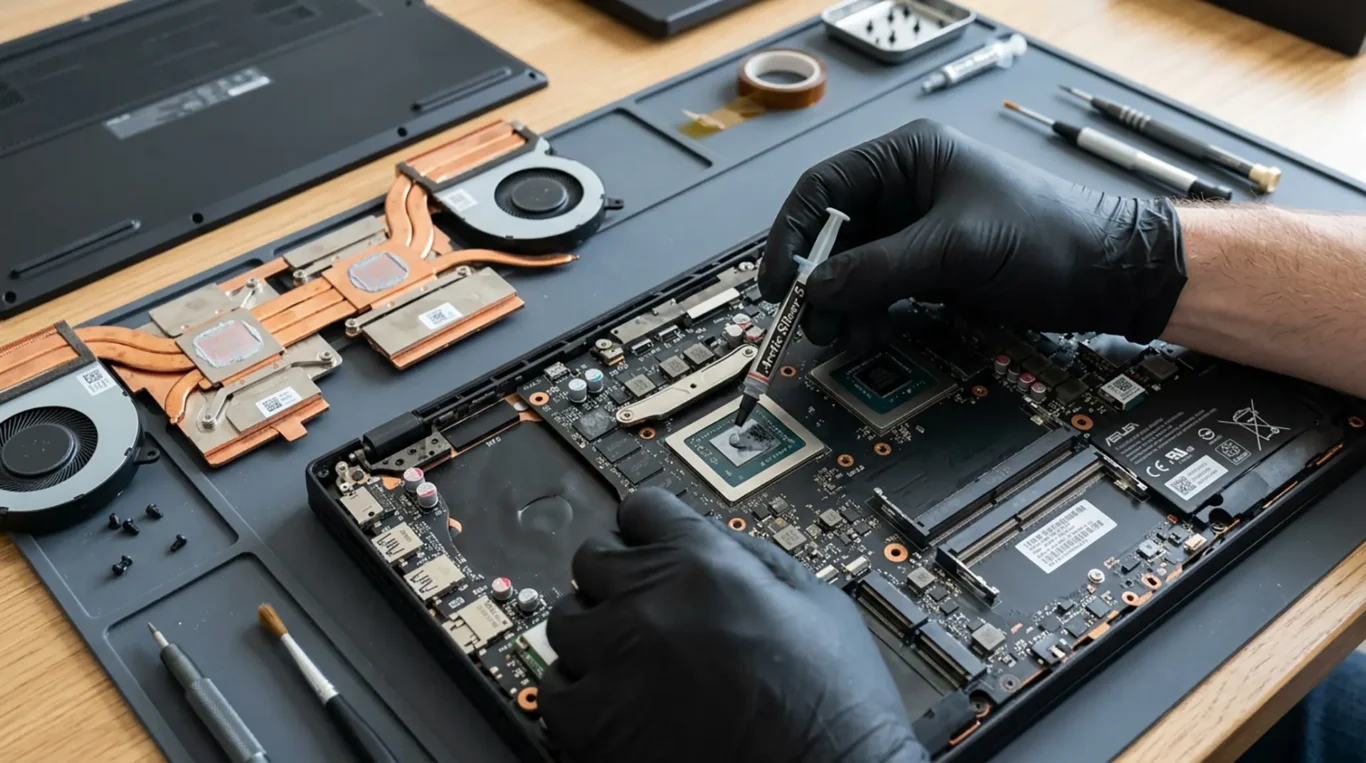
Repasting is also sensible during other internal work where the heatsink has to come off anyway. Fan replacement, some battery replacements, and most motherboard-level work involve removing the heatsink assembly. Once that seal is broken, reusing old paste is usually a false economy. Fresh paste is part of putting it back together correctly.
It may not help if the root cause is elsewhere. A failing fan (worn bearing, weak speed, unstable ramping) can look like a paste issue from the outside. Blocked heatsink fins can survive a quick clean if the dust is packed on the inside, where you cannot see it from the vents. A bad heatpipe is another one: the heatsink is fitted properly, but it does not transport heat along the pipe as it should, so one end stays cooler than expected.
Power and performance settings can also keep temperatures high. For a business laptop that lives on a desk, a high performance profile or aggressive turbo boost behaviour can push heat beyond what the cooling system can sustain, even when the hardware is fine. One small judgement call that saves time: if the machine is hot at idle, check background load and power mode before assuming paste has failed.
On older machines, it is worth weighing the value of the device against labour and risk. Some laptops need a near full strip-down to reach the heatsink. That adds time and increases the chance of breaking brittle plastics, damaging clips, or finding other age-related issues on the way. If the laptop is already struggling for other reasons, a repaste might not be the best use of effort.
Gaming laptops and thin-and-light designs often benefit more when a repaste is actually needed, because the thermal margins are tighter. They run closer to their limits by design. Small losses in heat transfer, or uneven contact, show up faster as spikes, noise, and throttling.
If you want a simple framework: confirm airflow first, then look at the thermal transfer layer. Repaste when symptoms point to poor contact or when the heatsink has to be removed anyway. Skip it when there is a more likely fault, or when the device is not worth the disruption.
Is repasting safe? Real risks and how professionals reduce them
It can be safe, but laptops in particular punish rushed work and small mistakes.
Repasting is not “dangerous” in the sense of electrics or high voltage. But it is risky in a practical, expensive way. Most of the damage I see comes from access and reassembly, not from the paste itself.
The main risks are mechanical. Screws can strip, especially on older machines where the heads are soft or already chewed. Plastics can crack when clips are tight or brittle. Cables can tear, and small connectors can be prised off the board if they are lifted the wrong way. Those faults are annoying because the laptop may have been working fine before the “simple” cooling job.
There is also ESD risk. ESD means static electricity damaging sensitive components. It is not always dramatic, and that is part of the problem. A proper bench setup, grounding habits, and not working on carpets and duvet covers makes a difference.
Incorrect reassembly is the quiet one. A laptop can boot and still be put together wrongly. Missing screws, misrouted cables, or a pinched fan wire can cause later failures and hard-to-trace intermittent faults.
Laptops have a specific twist: heatsink designs often trap cables, and many require a sequence. The heatsink and fan assembly might have to come out in a particular order because a ribbon cable runs under it, or because a bracket locks it in place. If you force it, things tear. If you refit it in the wrong order, you can end up with uneven contact.
Uneven contact matters because the heatsink has to sit flat on the CPU and GPU. If it is tightened unevenly, or tightened in the wrong pattern, pressure can concentrate on one corner. That can create hotspots where one part of the chip runs much hotter than the rest, even though you “used good paste”.
Thermal pads are another common trap. Pads are the soft, pre-cut sheets used on parts like VRAM and power components where a gap has to be bridged. Thickness and placement matter. Too thin and the pad does not touch. Too thick and it can lift the heatsink away from the CPU, making temperatures worse. Reusing pads that are torn, compressed, or misaligned is a classic reason cleaning alone did not fix overheating.
Cleaning technique matters as well. The safe approach is high purity isopropyl alcohol with lint-free wipes, and patience. You want to remove old compound without dragging grit around. Scraping a bare die (the exposed chip surface on some CPUs and GPUs) is a bad habit because it can scratch or chip an edge. If the old paste is stubborn, soften and wipe rather than dig at it.
A careful repaste is mostly about control. Correct tools. The right driver bit so screws do not round. Cable handling where you support the connector, not the wire. A consistent screw tightening pattern so pressure is even. And a final check that fans spin freely and cables are not trapped before the bottom cover goes back on.
My practical judgement call: if your laptop needs a full strip-down to reach the heatsink, and it is your daily work machine, think twice about doing it yourself the night before a deadline. The cost of one torn cable or cracked connector can outweigh the savings. If it is a desktop with easy access and you are comfortable working inside PCs, the risk is usually lower, but it still rewards a careful process.
Why a previous repaste sometimes makes things worse
When the paste has been changed but the laptop runs hotter or louder, the issue is usually contact or something disturbed during reassembly.
I see this a lot. Someone does the right thing in principle, replaces the thermal paste, and the machine then throttles sooner, the fan screams, or it shuts down. That does not mean repasting is a bad idea. It usually means one small detail stopped the heatsink from sitting flat, or the cooling system is no longer working as a complete set.
Thermal paste only works properly when two surfaces press together evenly. The paste is there to fill microscopic gaps, not to act as a thick layer. Too much paste can act like a spacer, and too little can leave dry spots. The more common problem is uneven contact – the heatsink is slightly tilted or tightened unevenly, so one corner of the CPU or GPU ends up much hotter than the rest.
Contamination is another quiet one. Paste put on top of old residue, or applied onto a surface that still has dust, fingerprint oil, or cleaning fibres, will not spread and bond properly. You can end up with a patchy contact pattern that looks “covered” but performs badly. It also makes the next clean harder because the layers smear rather than lift cleanly.
Thermal pads are the next common cause. Pads are the softer sheets used to bridge a gap to things like VRAM and power components. If pads are missing, shifted, or replaced with the wrong thickness, the heatsink can rock or sit proud. Even a small lift can ruin CPU contact and push temperatures up, even though the paste itself is fine.
Heatsink screws cause more trouble than most people expect. Many laptops use different screw lengths in the same assembly. If screws get mixed up, one may bottom out early, or a longer screw can damage a standoff. If screws are not fully seated, you get low pressure. Either way, the heatsink does not clamp evenly, and that shows up as higher temperatures and quicker throttling.
Then there is the fan side. It is possible to refit everything, but leave the fan connector not fully seated. The fan might not spin at all, or it might cut in and out. Separately, some machines change fan behaviour after BIOS or EC updates. EC means embedded controller – it is the chip that helps manage things like fan control. If the fan curve changes, the system can run hotter before the fan ramps up, which feels like the repaste made it worse.
Practical advice: if a repaste made temperatures worse, do not keep reapplying paste hoping it will “bed in”. Stop and check the basics. Confirm the fan spins, the connector is fully home, and the heatsink is seated flat with screws in the correct locations and tightened in the correct order. If thermal pads were disturbed and you do not know their original thicknesses, that is a sensible point to pause and get it assessed, because guessing pads is an easy way to chase the problem around.
What we check in a proper overheating diagnosis (beyond paste)
We look for the real cause first, so the fix lasts and you only pay for what the machine actually needs.
Thermal paste matters, but it is only one part of the cooling system. If a laptop is still running hot after a clean, I treat that as a sign to step back and measure what it is doing, then work through the likely causes in a sensible order.
The first step is baseline measurements. We check temperatures and behaviour at idle, under light load (normal office work), and under sustained load (something that keeps the CPU busy for several minutes). The pattern matters more than the peak number. A machine that spikes then settles is different to one that slowly climbs until it throttles. Throttling means the system slows itself down to reduce heat.
Next is airflow. We inspect the fan intake and the exhaust path, because a laptop can look “clean” and still be starved of air. We also check the heatsink fin stack. That is the thin set of metal fins where heat is dumped into the airflow. A compacted dust mat at the fin stack can block flow even when the fan spins normally, and the result is high temperatures that cleaning the keyboard area will not touch.
Then we do mechanical checks. A lot of overheating problems are really contact pressure problems. We check that the heatsink sits flat, that mounting posts are not cracked or pulling out, and that screws are intact and the right length. If a screw has stripped its thread, you can tighten it all day and still have poor clamping pressure. Paste cannot compensate for that.
We also check the components involved in moving heat. Fan health is not just “does it spin”. A tired fan can run slow, wobble, grind, or fail under load. We look for signs the heatpipe is not transferring heat properly too. A heatpipe is a sealed tube that moves heat from the CPU to the fin stack. If the CPU is extremely hot but the fin stack stays oddly cool, that is a clue worth taking seriously.
Sensor plausibility matters as well. In plain terms, we sanity-check the readings. If one sensor reports a temperature that does not match the rest of the system behaviour, we do not base decisions on it. False readings can cause noisy fans, unnecessary shutdowns, or the opposite problem where the fan never ramps up enough.
Software checks come next, because a laptop can run hot simply because it is being asked to work hard. We look for background processes, stuck updates, malware symptoms, and heavy browser tabs. We also check the power mode and any vendor performance profiles. A machine set to “best performance” on mains power will often sit hotter than the same machine set to balanced.
Where relevant, we consider BIOS and EC behaviour. BIOS is the firmware that starts the computer. EC means embedded controller – it handles things like fan control. Updates, resets, or corrupted settings can change when fans ramp up and how aggressively the system boosts the CPU. That can feel like a cooling failure when it is really a control issue.
Once the cause is clear, only then do we recommend work. Sometimes it is a proper clean of the fin stack and fan. Sometimes it is a fan replacement, a heatsink mounting repair, or a repaste done carefully with correct pad thicknesses. Sometimes the best answer is simply to adjust software and power settings. The judgement call is this: do not start with “repaste it and see”. If you diagnose first, you usually fix it once.
FAQ
Words from the computer cleaning experts
We often see machines that have been cleaned properly and still run hot, and a common problem is old paste that has gone dry and stopped transferring heat evenly. In practice, one of the first things we check is whether the heatsink screws have been tightened evenly, because uneven pressure can leave a hot spot even with fresh compound.
Repasting is generally safe when it is done carefully, but it is not always the right next step if the temperatures are still high after dust cleaning. If the fan is weak, the heatsink is not seating flat, or a thermal pad is the wrong thickness, new paste alone will not fix the root cause, so it is worth treating repasting as part of a diagnosis rather than a default answer.