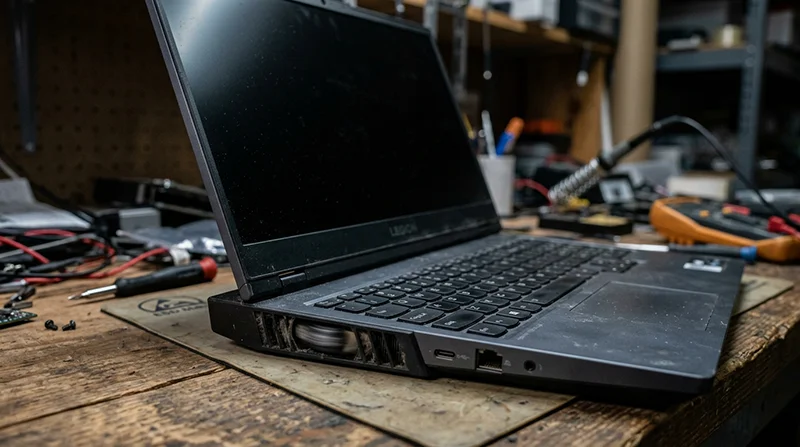
No power and no boot issues – motherboard causes
When a computer will not power on, or it powers up but will not boot, it is easy to jump straight to “the motherboard is dead”. Sometimes it is. Often it is not. The same symptoms can come from the charger, battery, power button, RAM, the screen, or a simple loose connection. A true motherboard fault usually means something on the main board is stopping power from being distributed properly, like a short circuit, corrosion from liquid, cracked solder joints, or a failed controller chip that manages charging or start-up. This article stays on the hardware side and focuses on what these signs can mean, what checks are worth doing, and when it is time for proper diagnosis rather than guesswork.

Symptoms that often get blamed on the motherboard (and why that is not always fair)
These common start-up failures can come from several parts, so it is worth narrowing the category before assuming the main board is at fault.
When something will not turn on, or it turns on but goes nowhere, the motherboard is an easy target. It is the centre of the machine, and a board fault can look dramatic. But the same outward symptoms can be caused by much simpler parts that sit around it.
First, it helps to separate two phrases that get mixed up:
- No power means no signs of life at all. No lights, no fans, no charging indicator.
- No boot means power is present, but the system does not reach the early start-up checks. (Those checks are often called POST, short for Power-On Self Test.)
Here are the common symptoms people report, and the broad causes they can fall under:
- No power at all – often power input related. A faulty charger or PSU, a damaged DC-in socket, a dead battery, or a bad power button board can all stop the system before the motherboard even gets a chance to start.
- Fans spin but no display – often memory or display related. Bad or loose RAM is a classic. So is a screen issue like a failed backlight, a damaged display cable, or a fault in the lid switch area on some laptops.
- Powers on then shuts down – can be power protection kicking in. A short circuit on a peripheral, a failing battery, or a loose internal cable can trip it. Overheating can also do it, but if it happens instantly from cold, I look elsewhere first.
- Black screen on startup – can still be a display problem, not a boot problem. If the machine is running but the panel is dark, the board might be fine. External display testing and checking the backlight circuit are usually more sensible than assuming a dead board.
Non-motherboard faults that commonly mimic a board failure include a faulty charger or PSU, a tired or shorted battery, RAM that is not seated properly or has failed, a display or backlight fault, loose internal cables (especially display and power), and a damaged power button board on laptops. Any of these can block power-up or stop the system before it can initialise.
Proper diagnosis saves money because it avoids unnecessary board work. Motherboard repairs are often possible, but they should be the conclusion, not the starting point. A quick, structured check of the power source, the basics inside, and the display path usually tells you which direction to go next.

How power reaches the board: a simple view of what has to happen
If you picture start-up as a chain of approvals, the usual “no power” and “no boot” symptoms make more sense
Most machines do not go from zero to fully on in one jump. They take power in, create a small always-available supply, then bring up the rest in a set order. If any step looks unsafe, the system stops. That is why faults can look sudden or inconsistent.
First is the input stage.
On a laptop, that is usually the DC-in jack or a USB-C Power Delivery (PD) port. The job here is to accept power and, in the USB-C case, negotiate the correct voltage before anything serious happens. On a desktop, the PSU provides several ATX rails (different output voltages) and the motherboard expects them to be present and stable.
Next comes standby power and sequencing. Standby power is a small “always-on” rail that exists even when the machine looks off. It feeds the parts that listen for the power button, charging, lid open, and so on. Only when standby is healthy does the board attempt the main rails, which are the heavier power lines used by the CPU, graphics, storage, and screen circuits.
That handover is controlled by a small controller, often called an embedded controller (EC) or a power management IC. You do not need the names. The important point is what it does: it requests each rail in order, checks that the previous one came up correctly, and watches for fault signals like overcurrent (too much draw) or undervoltage (not enough). If something looks wrong, it will refuse to continue or will shut the system back down.
This is also why a single shorted component can stop the whole sequence. A short is an unintended path to ground that pulls a rail down hard. The controller sees the rail collapse or the current spike and cuts power to protect the board, the charger, and sometimes the battery. From the outside, it can look like “dead motherboard”, but it is often the board protecting itself from a bad load.
Protective shutdowns can show up in a few familiar ways. You press the button and the light flashes then goes out. The fan twitches. A laptop charges but will not start. A desktop clicks and resets. Those are not always random. They can be the power sequence starting, seeing a fault, then aborting.
Practical advice: pay attention to whether you have stable standby signs, like a consistent charging light or a steady power LED, versus nothing at all. That one detail often separates an input problem (charger, DC-in, PSU, socket) from a board-side problem (short, failed controller, damaged rail). If the machine instantly shuts down from cold, I tend to prioritise power fault checks over overheating theories. It saves time and avoids chasing the wrong thing.
True no power: no lights, no fan, no response
This is about motherboard faults that stop the machine doing anything at all, and how we separate them from a bad charger or PSU.
When a device is properly dead, you get nothing. No charging light. No power LED. No fan twitch. No clicks. That usually means the board is not getting usable standby power, or it is shutting it down immediately for safety.
Before blaming the motherboard, we look for simple external signs. Does the laptop adaptor light stay on when you plug it into the machine, or does it go out? Does the desktop PSU click, then do nothing? Does the adaptor get unusually warm straight away? These clues do not prove a cause, but they point us towards either an external supply issue or a short on the board.
Motherboard-side short on an input rail
A common motherboard-level cause of total inactivity is a short on an input rail. A rail is just a power line at a specific voltage. If one is shorted, it drags the voltage down and the power source protects itself.
On laptops, this often shows up as the charger light going out when you plug in, or the machine appearing to do nothing even though the adaptor is known good. On desktops, you may hear a brief click from the PSU, then silence, or the board may never show any standby LED. Sometimes you get nothing at all because the supply refuses to start into a dead short.
Shorts can be caused by failed capacitors, damaged power MOSFETs (power switching transistors), or a shorted downstream load on the board. You cannot identify which one by symptom alone. You diagnose it by measurement.
Failed DC-in circuitry (laptop) or failed standby conversion (desktop)
If there is no short, the next suspect is the input and standby stage. On a laptop, the DC-in circuitry is the bit that accepts adaptor power, protects it, and feeds the charging and standby circuits. On USB-C machines, the Power Delivery controller also has to negotiate the correct voltage before the board will take real power.
On a desktop, the PSU provides a standby line (often 5V standby) even when the PC is “off”. The motherboard then converts that into the small always-on supplies it needs. If that standby conversion fails on the motherboard, you can end up with a board that looks completely lifeless even though the PSU itself is fine.
Blown protection parts after a surge or liquid
Motherboards have protection components on the power input. Their job is to sacrifice themselves when something nasty happens, like a surge, the wrong adaptor, or liquid tracking power where it should not go. If they blow open, nothing gets through. If they fail short, they can pull the input down and make the adaptor or PSU shut off.
After liquid exposure, you can also get a delayed failure. The machine may work for a while, then stop charging or stop powering on as corrosion grows under parts.

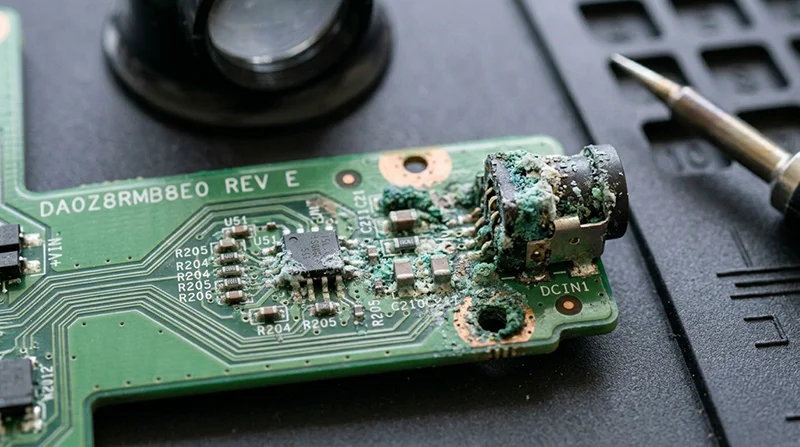
Corrosion under connectors and around the power input area
Power problems often live right at the edge of the board. Around the DC jack, USB-C port, battery connector, and nearby coils and power chips. Corrosion under a connector can break a connection without looking dramatic from the outside. It can also create leakage paths that confuse the power management and stop start-up.
This is one reason “it charges sometimes if I wiggle it” is worth taking seriously, even if it later turns into “now it is dead”. Movement can briefly make contact again, but it does not fix the underlying damage.
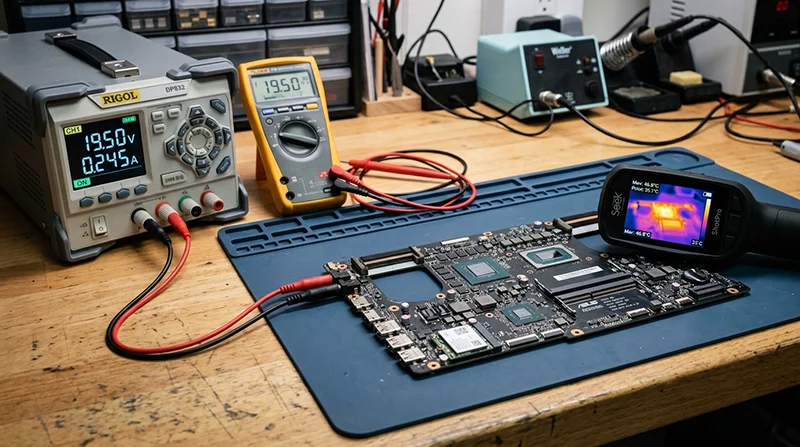
How a computer repair shop verifies it (without guesswork)
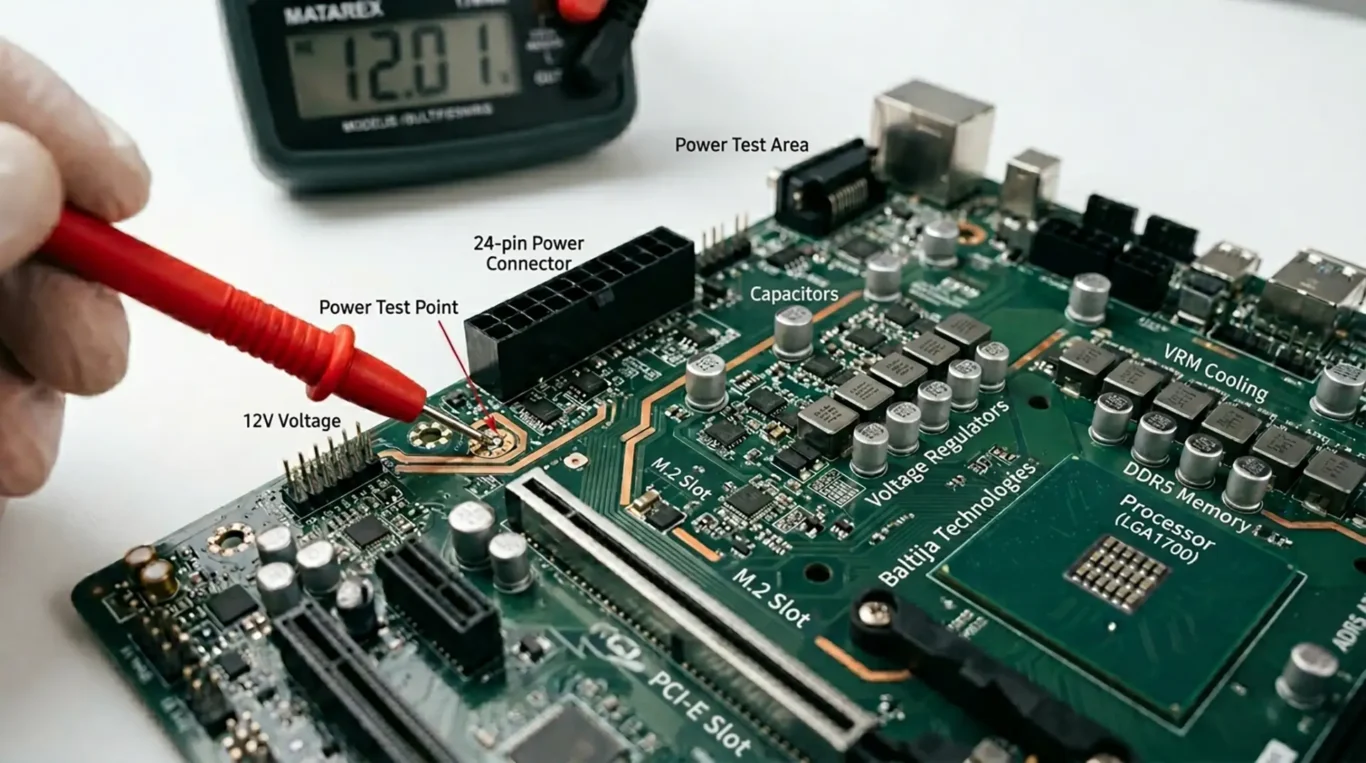
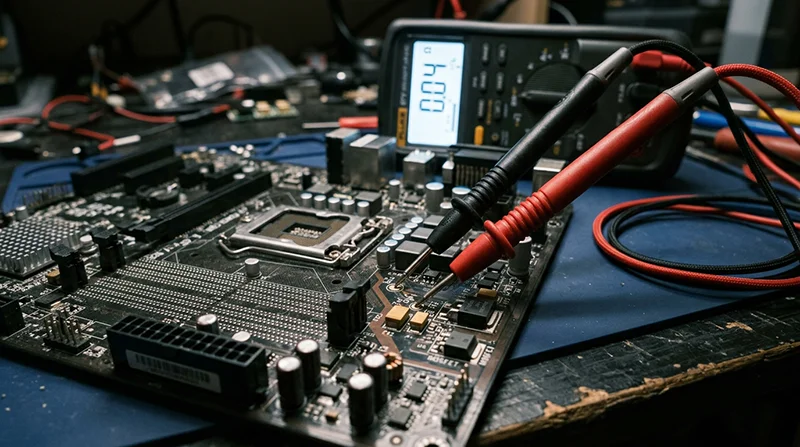
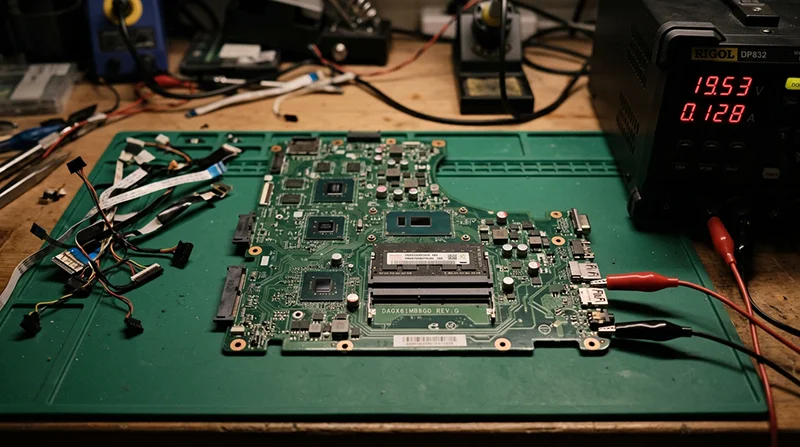
In the workshop we confirm the direction with a few non-destructive checks. The first is resistance testing on key power rails with the board unpowered. Low resistance in the wrong place suggests a short, and it tells us where to focus without repeatedly powering a stressed board.
We also look at current draw behaviour using a controlled power source. The concept is simple: a healthy board has a predictable low standby draw, then changes when you press the power button. A shorted rail often shows heavy draw immediately, or the current spikes and then drops as protection kicks in.
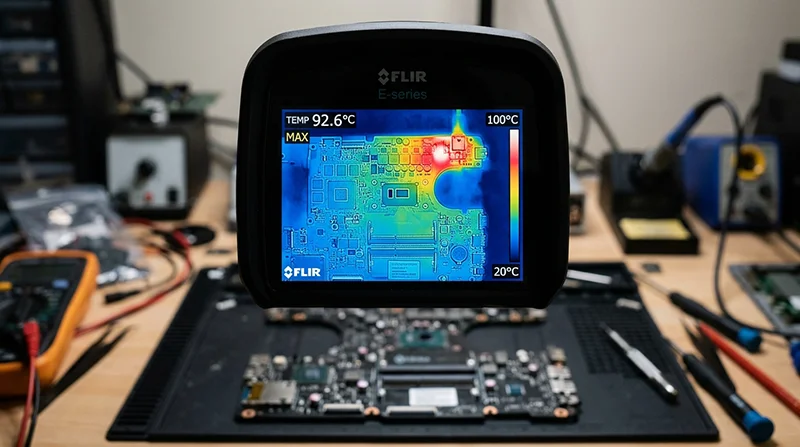
To locate the exact hot component, we use thermal tools. A thermal camera can show a tiny hotspot. Freeze spray can make the fault area frost melt first when power is applied in a controlled way. That narrows a “dead board” down to a specific component or section before any laptop repair is attempted.
When it is more likely the charger or PSU than the board
Sometimes the external power is the real problem. If a laptop shows no sign of charging and the adaptor’s light stays normal when connected, the adaptor may simply not be delivering the right voltage under load, or it may be the wrong type for USB-C Power Delivery. On desktops, a dead PSU can give you a completely inert machine with no standby LED and no reaction to the power button.
The sensible first step is to try a known-good charger or PSU of the correct rating and type, or have a shop test the supply properly. I would do that before authorising any board work, because it is the cleanest yes-no check and it avoids paying for diagnosis in the wrong place.
What I would not recommend is probing inside a live machine at home. Power rails can be unforgiving, and one slip can turn a repairable fault into board-level damage.
Powers on then shuts down after a second or two
This “power cycling” is usually the system protecting itself when a required power rail or signal is missing, unstable, or shorted.
You press power, you see a light or hear a fan twitch, then it clicks off again. Sometimes it repeats once or twice. That pattern is rarely random. Most modern boards do a quick safety check during start-up, and they shut down fast if something does not look right.
A quick definition: a power rail is a specific voltage line the board generates and feeds to parts like the CPU, RAM, storage, and chipset. The machine needs them to come up in the right order, at the right voltage, and stay steady.
One common cause is a power sequencing failure. The controller brings up rail A, then expects rail B to appear within a tight window. If rail B is missing, low, or wobbling, the controller aborts and cuts power. From the outside it looks like “it tries to boot then dies”, but internally it is often the board refusing to proceed.
Another big category is CPU or GPU power stage faults, often described as VRM issues. VRM means Voltage Regulator Module, basically the part of the board that makes low, high-current power for the processor and graphics. If that circuit is weak, shorted, or not switching properly, the system may start for a second and then shut down to prevent damage. On desktops this can happen on the motherboard VRM. On laptops it is usually integrated on the mainboard as well.
A shorted or faulty peripheral can cause the same shutdown, which is why it can look like a motherboard failure at first. I have seen a bad Wi‑Fi card, an SSD, a keyboard assembly, or even a USB device pull a rail down hard enough that the board cuts out instantly. The logic is simple: the board detects overcurrent and turns off rather than cooking a track or chip.
Liquid damage can be awkward here because it does not always fail cleanly. You can get a machine that powers for a moment, then trips protection as things warm up and leakage increases. It might do this more on the second attempt, which is a clue, but I would not keep repeating power cycles to “see if it stays on”. Each attempt can stress the same area again.
What a technician will usually try first is a minimal configuration. That means stripping the system back to the essentials: board, CPU (if removable), one RAM stick, and basic power. On laptops it can mean disconnecting the battery, keyboard, trackpad, speakers, secondary boards, and trying known-good RAM and storage where possible. The aim is to isolate whether something attached is causing the shutdown.
If the shutdown still happens when it is stripped down, we move to board-level measurement. We check whether key rails appear and remain stable, whether any rail is shorted, and whether the “power good” signals are present. Those signals are simple status lines that tell the controller a stage is healthy. If one is missing, you stop chasing symptoms and start looking at the exact stage that is failing.
Practical judgement call: if you have external devices connected, unplug them before you bring it in, and tell the shop what was attached when the issue started. It can save time. But avoid repeated power attempts at home, especially if there has been liquid, a burning smell, or the adaptor clicks off. At that point you want controlled testing, not more stress on the same fault.
Fans spin but no display: what the motherboard is (and is not) doing
Why you can get spinning fans even when the system never reaches the stage where it can show an image
Spinning fans often look reassuring. In practice, they only tell you that some power is present and something has triggered “on”. Many boards and laptops will spin fans at a default speed before POST (Power On Self Test). POST is the early hardware check that happens before anything can display. So yes, fans spinning can happen with a very sick motherboard.
This is also why “it has power” and “it boots” are not the same. The system might power parts of the board, run the fan controller, and still fail before it ever initialises the CPU, memory, or graphics.
RAM detection failures vs motherboard memory faults
One common reason for fans but no picture is that the machine cannot see usable RAM. If the CPU cannot train the memory (basically, agree timings and start talking to it), it may never reach the point where it can output video.
Sometimes that is simple RAM failure. Sometimes it is a motherboard issue around the memory slots or traces. Traces are the tiny copper tracks inside the board that connect the slot to the CPU. On desktops it can be a damaged DIMM slot, contamination in the slot, or a bent CPU pin affecting a memory channel. On laptops it can be cracked solder on onboard RAM, or damage in the memory power circuitry.
A useful clue is consistency. If you swap RAM sticks and slots (where possible) and the behaviour changes, that points towards RAM or a slot. If nothing changes at all, it does not prove the board is fine. It just means you need deeper testing with known-good parts and board-level checks.
GPU and iGPU initialisation problems
Video output only happens once the graphics side is initialised. That might be the iGPU (integrated graphics inside the CPU) or a dedicated GPU (a separate graphics chip or card). If that stage fails, you can get a black screen while fans keep running.
Dedicated GPU faults do happen, but I avoid jumping straight to “GPU is dead”. It could be the GPU itself, the VRM supplying it (its power stages), or a missing rail elsewhere that prevents initialisation. On some laptop designs there is also BGA solder fatigue risk over time. BGA is the style of soldered connection under chips, and repeated heat cycles can lead to cracked joints. When that is the cause, the symptom can be intermittent at first, then become permanent.
Power rails matter here too. A GPU can be physically fine, but if its core voltage rail is shorted, low, or not enabled, the board will not bring up graphics and you will see no display. This is where proper measurement beats guesswork.
Display path problems that are not motherboard-related
Not every black screen is a motherboard or GPU fault. The display path can fail after the graphics is working.
On laptops, a failed panel, backlight, or display cable can give you “powers on, no picture” even though the machine is actually booting. If you can hear Windows sounds, keyboard backlight behaviour looks normal, or Caps Lock responds, that suggests the system may be alive and the issue is just the screen side.
An external monitor can be a helpful clue. If external works but the internal screen stays black, that points to panel, cable, or backlight rather than the core board. If neither internal nor external shows anything, it leans more towards memory, graphics initialisation, or board-level power and control signals. It is not a perfect test, but it is a sensible first split.
Beep codes and diagnostic LEDs
Some desktops have beep codes or diagnostic LEDs on the motherboard. Some laptops have blink patterns on the power light. In principle, these are the system telling you where POST stopped, such as CPU, RAM, GPU, or boot device.
They are not universal, and the meaning depends on the board model. But if you have them, note the pattern and tell your repair shop. It can save time because it narrows the first set of checks to the stage that failed.
Practical judgement call: if you get fans but no display, do not keep hard rebooting it “until it catches”. If the fault is power related or a short, repeated attempts can make the damage worse. One or two controlled tests (different monitor, remove USB devices, try known-good RAM if you have it) is reasonable. After that, it is usually better to stop and diagnose properly.
Black screen on startup: POST vs backlight vs boot
The exact point where the picture fails tells you which hardware path to test first.
“Black screen” can mean a few different failures that look similar from the outside. If you can describe which type you have, it changes the likely cause and saves time in diagnosis. I usually start by separating backlight behaviour (is the screen lighting up?) from image behaviour (is there actually a picture being drawn?), then from boot behaviour (does it get past the initial power-on checks?).
1) No backlight at all
This is when the screen looks completely dead, even in a dark room. On many laptops you can tell because there is no faint glow and no change in brightness when you power it on.
Motherboard causes can include a fault in the backlight power circuit. That circuit generates a higher voltage for the panel backlight, and it is often protected by tiny fuses and switches on the board. If a fuse is open, a connector is damaged, or a backlight power chip has failed, you can get a perfect working laptop that you simply cannot see.
It can also be eDP or LVDS power issues. eDP/LVDS is the display cable standard between the motherboard and the screen. If the board is not supplying the right panel voltage, the backlight controller may not start, or the panel may stay off to protect itself.
2) Backlight on but no image
Here the screen lights up, but you never see a logo, cursor, or any text. That often points away from the backlight side and towards the signal side.
On the motherboard, this can be a problem with the graphics output path, the panel power enable signals, or the embedded controller. The embedded controller is a small chip that runs the keyboard, power button logic, charging, and a lot of “turn this on now” signals. If it is not behaving, the machine may power up but not bring up the display properly.
Another board-level cause is corrupted firmware stored on a flash chip. This is still hardware in the sense that the chip and its data have to be readable for the system to initialise. When it is damaged or the data is corrupt, you can see a solid black screen even though power rails look normal.
3) Logo appears then freezes
If you see the manufacturer logo and then it locks up, that suggests the display is working and the system got through at least part of POST. POST is the first hardware self-check at power-on.
Hardware causes I look for here include unstable power rails, marginal RAM behaviour, or a firmware issue that only shows once certain devices are initialised. It can also be a storage device shorting a rail or pulling a line down, which stops progress even though the screen is fine. This is why a controlled test with non-essential devices disconnected can be useful, but it needs to be done carefully.
4) Intermittent image
If the picture comes and goes, changes when you move the lid, or only fails when the laptop is warm, think physical and heat-related faults.
Common motherboard-side causes are cracked solder joints, small connector damage, or faults that appear under flexing. Heat can also make weak solder or a marginal component drift out of tolerance. You might see it work cold, fail hot, or fail only after sleep and wake. Intermittent faults are some of the hardest to prove without testing under load and watching voltages and signals as the fault happens.
Why an external monitor test matters
An external monitor helps you answer one key question: is the laptop producing a video signal at all?
If external display works but the internal screen is black, the system is generating video and the fault is likely in the internal display path. That can still be motherboard-related, such as a blown eDP backlight fuse or a bad panel power circuit, but it moves you away from CPU and RAM as the primary suspect.
If neither internal nor external shows anything, that points more towards early initialisation failure. That can be GPU or iGPU initialisation, RAM training, missing power rails, an embedded controller issue, or firmware not being read properly. It does not prove which one, but it tells you the problem is not just the laptop screen.
Practical judgement call: if the fault is intermittent, avoid repeated lid flexing and forced restarts to “bring it back”. If a cable is arcing, a rail is shorting, or a component is overheating, you can turn a recoverable fault into a dead board. Note the pattern instead: cold vs warm, lid position, and whether external output ever appears.
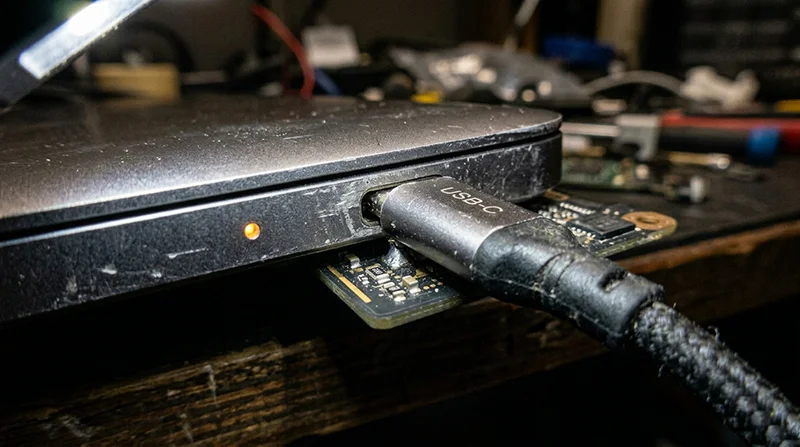
USB-C charging and modern laptops: when power negotiation is the problem
Some newer laptops look completely dead because they cannot agree power from the charger, even though the battery and main board are not totally lifeless.
With USB-C charging, the laptop and charger have a short “conversation” before anything meaningful happens. This is called USB Power Delivery (USB-C PD). They agree a voltage and current, then the laptop allows power through to the charging and system rails.
When that negotiation fails, you can get a laptop that looks dead. No charge light. No fan twitch. Nothing on screen. In a lot of cases the fault is on the motherboard side, not the battery.
A common board-level cause is a faulty USB-C PD controller or charging IC. That is the chip that handles negotiation and then manages how power is routed and how the battery is charged. If it fails, the laptop may refuse all chargers, or only accept power in limited conditions.
The USB-C port itself is also a real failure point. It is a small connector doing a big job. Mechanical wear, a loose centre tongue, or cracked solder joints can cause intermittent contact, which leads to negotiation failures. You might see it connect, drop, reconnect, then drop again. That can make the laptop cycle on and off or keep restarting the charging process.
Symptoms I see a lot include: it works on some chargers but not others, it only charges when the laptop is fully off, or it charges for a few seconds then stops and repeats. Some machines will show a charge LED flicker, then go quiet. Others will power up for a moment and shut down as soon as the load increases.
Correct wattage and a proper USB-C cable matter. Many laptops will not accept a low power charger, and a poor cable can drop voltage under load. But using the “right” charger does not prove the laptop is fine. A marginal charging circuit can still fail once the system tries to draw more power, even if it looks OK at first glance.
Diagnosis is mainly about proving what power is being agreed and where it stops. On the bench I check the negotiated voltage and current, not just whether a light comes on. Then I inspect the USB-C port closely for movement, heat marks, bent pins, or solder cracking. If the port is sound, the next step is checking the surrounding circuitry on the board for damage, corrosion, or a failed PD or charging chip.
Practical judgement call: if the USB-C plug feels loose or charging only works when the connector is held at an angle, stop forcing it. That is when ports and pads get torn off the motherboard, and a port repair turns into a more complex board repair.
Liquid damage, corrosion, and contamination: delayed motherboard failures
Why it can seem fine after a spill, then refuse to power on or boot days or weeks later
A spill does not always kill a laptop on the spot. Sometimes it boots, charges, and looks normal. Then it starts doing odd things. Random shutdowns. No power. Fans spin but no display. That delayed failure is very often motherboard contamination and corrosion working in the background.
Liquid leaves minerals and residue behind, even when it dries. That residue can sit around the keyboard area, the power button circuit, the charging section, and the small connectors that carry low voltage signals. It can create intermittent faults. The laptop might work when cold, fail when warm, or change behaviour depending on pressure on the palmrest or keyboard.
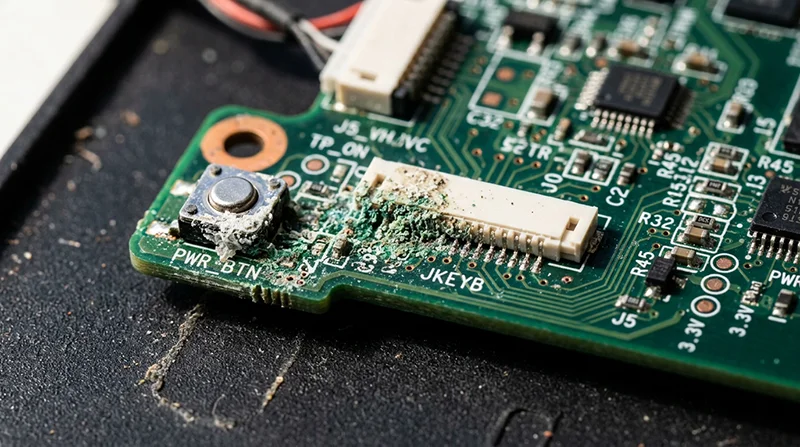
The bigger issue is corrosion under chips and connectors. Corrosion is a chemical reaction that eats metals over time. Under an IC (a small black chip) it can bridge tiny pads, causing leakage and shorts. Leakage means current is sneaking through where it should not, which upsets power rails and start-up checks. Eventually it can turn into a hard short and the machine goes dead.
Connectors are common failure points too. Keyboard and trackpad connectors sit right in the line of fire on many models. A bit of contamination there can pull down a control signal and stop the board from starting properly. I also see residue around charging circuits that causes unstable charging, sudden cut-outs, or a laptop that turns on then shuts down as soon as it tries to draw real power.
Proper repair is not “dry it and hope”. It is inspection and cleaning with control. The board needs to come out so we can check both sides, get under shields, and look for corrosion trails, green or white deposits, and darkened components. Where appropriate, we use ultrasonic or controlled cleaning to remove contamination from under chips and around fine-pitch parts. Then we re-check the board and replace damaged components and any compromised connectors. Drying alone does not remove conductive residue.
Realistic outcomes matter here. Some liquid damaged boards are fully repairable, especially if caught early and the corrosion is localised. Others are not cost-effective once damage has spread under multiple chips or into high-density areas, or if tracks have been eaten away. The value of the laptop and the replacement cost of the board also affects the decision.
Practical judgement call: if you know there has been a spill and the laptop is still working, do not treat that as “all good”. Back up anything important while it still runs, then get it checked. The sooner contamination is removed, the better the chance of avoiding a no-power failure later.
What a proper motherboard diagnosis looks like (and what ‘board repair’ actually means)
Here’s how we narrow it down using evidence, so you pay for the right fix and not guesses.
When a computer will not power on, or it powers up but will not boot, it is tempting to jump straight to “the motherboard is dead”. In the workshop we try to earn that conclusion. The aim is to prove what is faulty, then choose the repair that makes sense for the machine and the data on it.
A proper diagnosis starts non-invasive. That means nothing gets soldered, and nothing gets forced.
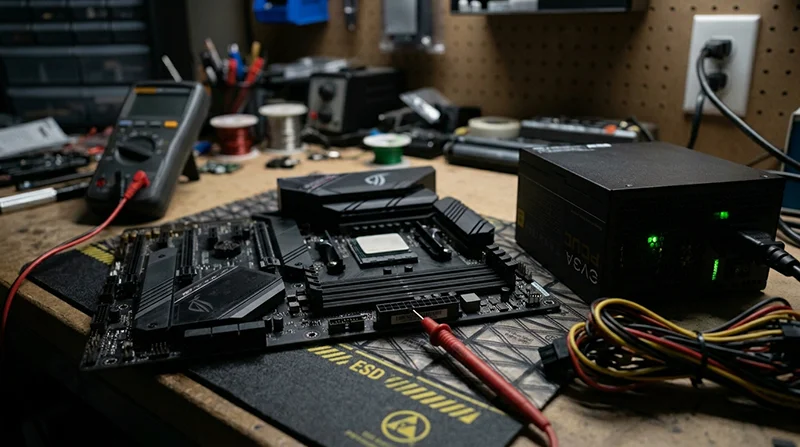
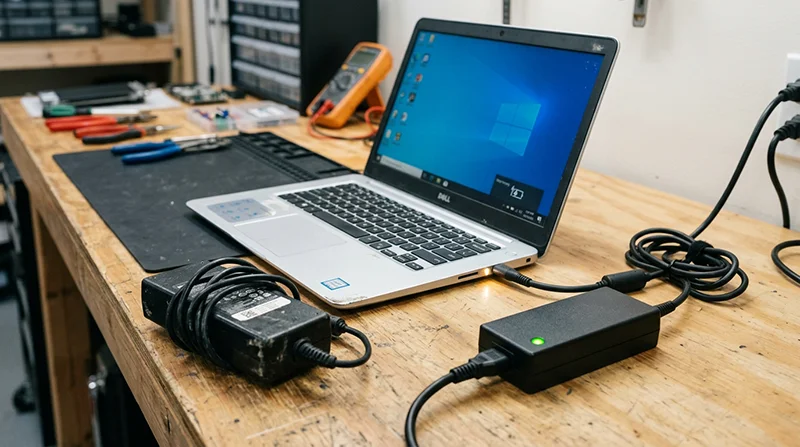
First we use a known-good power source. On a laptop that means a tested charger and, where relevant, checking whether the machine behaves differently on battery versus charger. On a desktop it means a known-good PSU (power supply unit) or proper PSU testing, not “it looks like it’s spinning so it must be fine”.
Next is a minimal configuration. We strip the system back to basics so we are not chasing side effects. That can mean disconnecting drives, removing non-essential cards, trying one RAM stick, and using onboard video where possible. If a laptop has a removable battery, we may test with it disconnected. This step is boring, but it avoids blaming the board for a bad peripheral.
Then we do a careful visual inspection. Burn marks are rare, but damage around charging ports, cracked solder joints, lifted pads, liquid residue, and knocked components are common. We also look for “previous work” issues, like missing screws, torn flex cables, or connectors that have been prised off at an angle.
If those checks point back to the motherboard, that is when board-level fault finding starts. This is where “board repair” actually lives.
We check power rails. A power rail is a voltage line the board needs to start and run. Modern boards do not just have one voltage. They have a sequence. If one rail is missing, low, or unstable, the system can refuse to boot, turn on then shut down, or sit with fans spinning and no display.
We also check for shorts. A short is an unintended low-resistance path that drags a power rail down. Shorts can be caused by failed capacitors, damaged ICs (chips), contamination from liquid, or physical damage near ports. If a rail is shorted, the laptop might show no signs of life at all, or it might cycle on and off.
Power-up sequence signals matter too. These are small “permission” signals that tell the next stage to wake up. If the charging controller, embedded controller, or power management section does not see the right conditions, it will stop the start-up process on purpose. That is why you can get symptoms like “power light on, nothing else” or “keyboard lights up, then it dies”.
We use thermal clues as well. Some faults show up as one component heating up abnormally fast. That can help pinpoint the area even when nothing looks burned. It is a clue, not a verdict, and it still needs measuring to confirm what is happening.
Once the fault is identified, the repair usually falls into a few common types:
- Port replacement – most often DC jack or USB-C charging ports, and sometimes HDMI or USB sockets. This is only viable if the board pads and tracks are still intact.
- Short removal – locating and replacing the failed part causing a rail to be shorted, often a capacitor or power IC.
- Power IC replacement – swapping a charging controller, power management IC, or related parts that control the start-up sequence.
- VRM component replacement – the VRM (voltage regulator module) feeds the CPU and GPU. Failed MOSFETs, drivers, or capacitors here can cause no power, shutdowns under load, or fans with no display.
- Trace repair – repairing broken tracks (thin copper lines) or lifted pads after damage, corrosion, or a torn port. Sometimes that means micro jumpers, sometimes it means the board is not a sensible candidate.
Sometimes replacement is the sensible route. Severe corrosion is a big one, especially when it has crept under multiple chips or into connectors across the board. Multi-layer damage is another. Many boards have internal layers you cannot fully inspect, so if tracks are eaten away inside the board, repair can become unpredictable. Rare parts also matter. If a key IC is unobtainable or only available from risky sources, you can spend time and money and still end up stuck.
Time versus value is a real factor too. A board-level repair can be very cost-effective on a high-end business laptop or workstation. On an older, low-value machine, the same labour may not be rational even if the repair is technically possible. A good shop should tell you when you are throwing good money after bad.
Data considerations should shape the plan. If the priority is the files, we treat that differently from a “make it reliable for daily use” repair. In some cases, the best move is a targeted repair to get the board stable long enough to pull data safely. In others, we avoid risky board work and move straight to data recovery methods, especially if the storage is soldered to the motherboard and cannot simply be removed.
Practical judgement call: if the machine contains business-critical data and it is already acting unstable, do not keep power-cycling it “to see if it comes back”. Each attempt can worsen a short, cook a component, or corrupt storage. Stop, document the symptoms, and get it assessed with the data outcome in mind.
When to stop testing and book a repair
Clear decision points to avoid making a hardware fault worse, without taking the machine apart
With no power or no boot faults, a bit of basic checking is fine. Repeated power cycling is not. If the motherboard is shorting or a power component is failing, each attempt can add heat and stress in the same area.
Stop immediately if you notice any of these:
- A burning smell, or the casing smells “electrical”.
- Heat at the charger plug, USB-C port, DC jack, or the charger brick itself.
- Repeated shutdown loops, where it tries to start then cuts out and repeats.
- Visible liquid residue, green or white crusting, or corrosion around ports or vents.
Also stop if your charger or PSU is clicking, pulsing, or shutting down and restarting. Many power supplies have protection that trips when they detect a short (an unintended low-resistance path) or an overload. Forcing it at that point can damage the port, the charger, or the board.
If it is a laptop, do not keep trying different USB-C chargers “just to see” unless you are sure they are the right type for the machine. Mixed standards and marginal adapters can confuse the charging negotiation and make diagnosis harder. If you are not sure, pause and get it checked.
Overheating-related shutdowns deserve a slightly different decision point. If the system powers on, then reliably shuts down after a short time, it can be thermal protection doing its job. That still needs proper diagnosis, and on many machines it is not just dust. In our London workshop we see plenty of cases where a clean-out, fan and heatsink service, and correct thermal paste application fixes the root cause, but only after confirming the cooling system is actually the issue and not a power rail fault that looks similar.
When you book it in, the most useful thing you can bring is clear information, not guesses. It saves time and it usually makes the first test more accurate.
- The exact symptom: no lights at all, fans spin but no display, turns on then shuts down, black screen on startup.
- What the lights do: power LED, charging LED, keyboard backlight, caps lock behaviour.
- Any recent spill, drop, or bag crush, even if it “seemed fine” afterwards.
- The charger type you use: USB-C or barrel plug, and whether it is the original one.
- Any previous work: ports replaced, battery replaced, cleaning attempted, or parts swapped.
One practical judgement call: if it is acting intermittently, do not try to “prove” the fault by running it until it dies again. Intermittent power faults are often the ones that turn into board damage. Note what you saw once, then stop and bring it in for in-shop diagnosis on the laptop or desktop.
FAQ
Words from the computer repair experts
On no power and no boot jobs, we often see the same patterns repeat. A common problem is a board fault that looks like “nothing happens”, but the cause is further upstream than people expect. In practice, one quick way we narrow it down is checking whether the charger voltage is present at the motherboard input.
If the machine shows any sign of life then shuts down, or fans spin with no display, I would treat it as a diagnosis-first situation rather than swapping parts. That kind of behaviour can come from a localised motherboard issue, but it can also be triggered by something external, so guessing often wastes time and can create new faults.