Professional laptop dust cleaning – what is included and why it is safe
When we talk about professional laptop dust cleaning, we do not mean polishing the case or making it look new. We mean restoring proper airflow through the cooling system inside the laptop, so heat can leave the machine the way it was designed to. Dust builds up in the fan and the heatsink (the metal part that pulls heat away), and over time that can lead to higher temperatures, louder fan noise, and slowdowns when the laptop protects itself by reducing performance.
This article explains what is included in a proper clean, what is not included, and why it is safe when done correctly. It is not a DIY guide. The exact steps vary by make and model because some laptops open easily and others are built in layers, but the aim is the same: clear the blockage, check the cooling parts, and put it back together without stressing connectors or components.
When laptop dust cleaning is the right service
Match the symptoms to restricted airflow, and know when a clean is unlikely to change anything
Dust cleaning makes sense when the laptop is struggling to get rid of heat. The cooling system relies on a fan pushing air through a heatsink. The heatsink is the metal fins that dump heat into the airflow. When the fins clog, heat stays inside and everything else starts to look “wrong”.
These are the common signs we see when airflow is restricted:
- Loud fan that ramps up quickly, even during basic work.
- Hot chassis, especially around the keyboard area or underside.
- Sudden slowdowns under load like video calls, spreadsheets, design work, or anything that pushes the CPU.
- Unexpected shutdowns, often after a period of sustained work.
- High temperatures in normal use, where the machine feels hot doing things that used to be fine.
It is also worth thinking about what dust cleaning does not usually fix. Some problems look similar on the surface but come from elsewhere.
- Poor battery life is more often battery wear, power settings, or a charging issue.
- Wi-Fi dropouts are typically network related, driver related, or an internal Wi-Fi card/antenna fault.
- General software slowness can be storage, updates, startup bloat, or application issues rather than heat.
- Physical damage (drops, liquid, bent casing) needs inspection and computer repair first, not just cleaning.
Diagnosis matters because the same overheating symptoms can come from different faults. A failing fan can spin slowly or intermittently. Dried thermal paste can stop heat transferring properly from the chip to the heatsink. Power issues can also trigger shutdowns or throttling that looks like heat stress.
If your laptop only struggles in one specific app, or it is slow from the moment it boots, cleaning may not be the best first spend. But if the fan noise and heat are clearly the story, especially if it has been a couple of years in regular use, a proper internal clean is often the sensible starting point before chasing more expensive parts.
What is included in a professional laptop dust clean (step by step)
A proper workshop clean follows a careful workflow, so nothing gets forced and the cooling system is actually cleared rather than just blown around.
A good clean is not just “some air in the vents”. The aim is to remove the dust where it blocks airflow, check the cooling parts are healthy, and then rebuild the laptop without stressing connectors or plastics.
Here is what that usually includes.
1) Initial intake and inspection
We start by confirming the symptoms you are seeing. When does the fan get loud, and what were you doing at the time? We also check fan behaviour in front of you where possible, because it is useful to hear whether it is a normal ramp-up or a rough bearing noise.
Before opening anything, we note the condition of the casing and ports, and we check for existing damage. That includes things like cracked corners, bent base plates, missing screws, and signs a laptop has been opened before. This protects you and it protects the job, because a missing screw or a warped cover can cause its own rattles and airflow gaps.
2) Safe disassembly that matches the model
Laptops are not built to a single pattern. Some come apart from the bottom cover. Others are keyboard-top case designs where the top section lifts and everything is layered underneath. Many have hidden screws under rubber feet or trim, and some have fragile clips that only release in a certain order.
A professional clean means opening the device in the least stressful way for that specific chassis. It is slower than forcing it, but it avoids snapped clips, torn cables, and marks around the edges. If a machine is already missing screws or has damage, we work around it and make a note, rather than trying to “make it fit”.
3) Internal dust removal in a controlled way
Once inside, we clean the chassis, vents, and intake areas. The intake is where the fan pulls air in, usually from the base. Dust tends to collect along those edges and corners, then gets dragged into the cooling system over time.
The key is control. You want dust removed from the machine, not redistributed deeper into it. We focus on the places that affect airflow and heat, and we avoid disturbing components that are not involved in cooling.
4) Fan cleaning and condition check
The fan is cleaned properly, including the blades and the inside of the housing. That is where dust cakes on and throws the fan slightly out of balance, which can make it louder even when temperatures are not extreme.
We also check the fan’s mechanical condition. Does it spin freely? Is there wobble? Any bearing noise? If a fan feels rough, a clean can help temporarily, but it may still need replacement to stop the noise coming back. That is a judgement call we would rather make early than after you have paid for a clean that cannot fix a failing bearing.
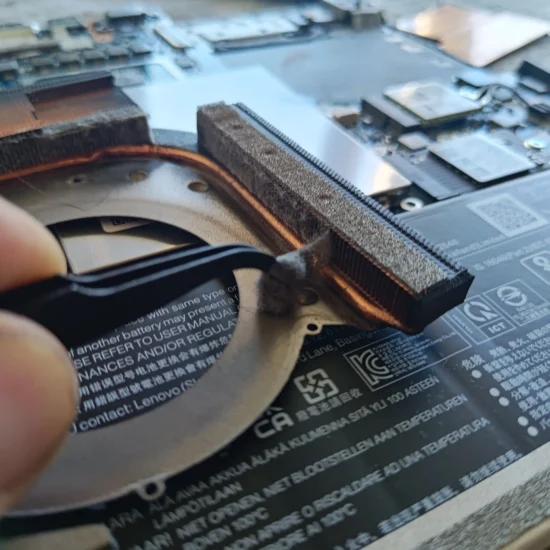
5) Heatsink and fin-stack cleaning
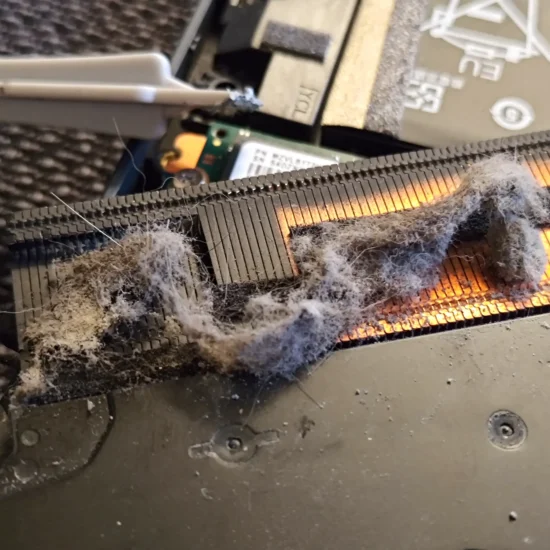
This is the part most people never see, and it is usually where the real blockage lives. The heatsink is the metal part that pulls heat away from the processor. The fin-stack (also called the radiator fins) is a tight set of metal fins where the hot air is meant to pass through.
Lint and dust often build into a felt-like mat on the fin-stack. From the outside, the vent can look fine. Internally, airflow can be almost sealed. A proper clean removes that packed layer so air can actually move through the fins again.
6) Airflow path check
Cleaning is not only about the fan and the heatsink. We check the whole airflow path from intake to exhaust. That means confirming vents are clear, and that any foam seals or ducting are seated correctly.
Those seals look unimportant, but they stop air taking shortcuts inside the chassis. If a seal is misaligned, the fan can move air without pushing it through the fin-stack, which defeats the point of cleaning.
7) Reassembly done carefully
Reassembly is where a rushed job shows. We put the laptop back together with the correct screw lengths in the correct positions, and with torque awareness. Over-tightening can strip threads or crack plastic, and under-tightening can cause flex and rattles.
If any clips or small fittings are already damaged, we flag it. Where practical, we replace damaged clips or fixings so the casing sits flat and the vents line up. A cover that does not sit properly can worsen temperatures, even after a clean.
8) Post-clean test and confirmation
After the clean, we test the laptop in normal use conditions. We check that the fan ramps up and down sensibly, and that noise is improved. We also confirm temperatures are healthier under typical loads. The exact numbers depend on the model, but the practical goal is simple: less heat, less noise, fewer slowdowns.
If the machine is still running hot after a thorough clean, that usually points to something else, such as dried thermal paste, a weak fan, or a heatsink seating issue. In that case, we would tell you rather than pretending dust was the only problem.
Thermal paste replacement: when it’s part of the job (and when it isn’t)
Dust affects airflow, paste affects heat transfer, and we decide based on how your laptop is actually behaving.
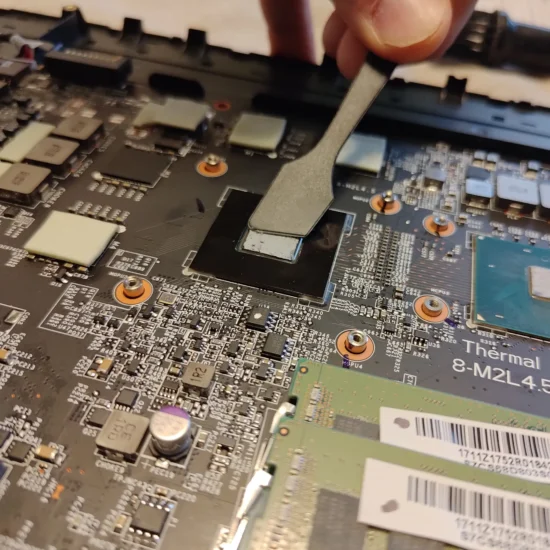
Thermal paste is a thin layer between the processor and the heatsink. Its job is to fill tiny gaps so heat can move into the metal properly.
Over time it can degrade. It can dry out and go chalky, which reduces contact. It can also slowly shift from heat cycles, sometimes called pump-out, where paste moves away from the centre and leaves weaker coverage.
That is why dust cleaning and thermal paste replacement are related, but not identical. Dust blocks airflow. Paste issues stop heat getting into the heatsink in the first place. You can fix one and still have a problem with the other.
We commonly recommend paste replacement on older machines, or where there is a clear history of overheating and heavy fan noise. It is also often sensible for gaming laptops and mobile workstations. They run hot by design, and they do not tolerate weak thermal contact for long.
Another straightforward case is when the heatsink has to come off during the job. Once the heatsink is lifted, the existing paste seal is disturbed. Reusing it is rarely worth the risk, because you can end up with uneven contact and worse temperatures than before.
There are times we may skip it. If a modern laptop is running at sensible temperatures once airflow is restored, and the heatsink does not need to be removed, there may be little gain from going deeper. Also, some designs make access awkward, and the extra disassembly adds risk to fragile clips, adhesive parts, or delicate cables. In those cases, the safer option can be to clean properly and reassess rather than forcing a paste job that is not needed.
If paste replacement is done, it has to be done correctly to be worthwhile. Both contact surfaces must be cleaned properly, then the heatsink needs to be mounted evenly with the right pressure. Too little pressure leaves gaps. Too much can stress the board or strip threads. A rushed paste job can make an overheating problem look like a bigger fault, when it is really just poor heatsink seating.
Practical rule of thumb: if the laptop has been throttling (slowing itself down due to heat), shutting down, or has a long-running heavy workload, paste replacement is usually a sensible part of the service. If it is a newer office machine that settles down after a thorough airflow clean, it can be reasonable to leave the thermal interface alone and keep the job lower risk.
What is not done during a dust cleaning (so you know the limits)
This sets clear boundaries so you are not expecting cosmetic detailing, liquid cleaning, or fixes for unrelated faults.
A proper internal dust clean is focused on airflow and cooling. That means removing dust from the fan, heatsink, and the paths air uses to get in and out. It does not mean every part is cleaned to a showroom finish, and it does not automatically include other repair work.
Below are the main things that are not part of a standard dust cleaning, unless we agree them in advance.
No washing of parts and no liquids near the motherboard. The motherboard is the main circuit board inside the laptop. Sprays, contact cleaners, and water-based cleaning are not used as part of routine dust removal. Liquids are only used when the job is explicitly a separate corrosion or liquid-damage process, where the aim is to remove residue safely and inspect for affected components.
No “spray air through the vents and hope” billed as a full clean. A quick blast through the vents can shift some loose dust, but it often pushes debris deeper into the heatsink fins or packs it into a tighter mat. A full clean involves opening the machine and cleaning the fan and heatsink directly. If you are paying for an internal clean, it should be internal.
No replacement of parts unless agreed after diagnosis. Fans, heatsinks, batteries, and other parts are only replaced if testing shows a fault or wear that actually matters, and you approve it. Sometimes a noisy fan is just dust imbalance. Sometimes it is a worn bearing and cleaning will not last. The sensible approach is to clean first, then decide based on what we find and how it behaves.
No software “tune-up” presented as part of dust cleaning unless requested. Dust cleaning is a hardware service. It does not include changing settings, removing programs, reinstalling Windows, or optimising startup items unless you ask for that work. If the laptop is slow, that can be a separate issue like storage health, low memory, or background software. Mixing it into a cleaning job without discussing it usually creates confusion.
No cosmetic restoration. We do not polish cases, remove every mark, or deep clean keyboards as part of an internal dust service. A light wipe is normal during handling, but cosmetic cleaning is a different job with different risks, especially around key mechanisms and trackpads.
Practical advice: when you book, tell us what you are trying to fix. Overheating, loud fan noise, random shutdowns, or general maintenance are all different starting points. If your main concern is performance or crashes, it may be better to pair cleaning with a quick health check, but it should be a deliberate choice rather than an assumption.
Why professional computer cleaning is safe when done correctly
The main risk people worry about is damaging parts, so the job is controlled and methodical rather than rushed.
Laptops are compact. Parts sit close together, and some connectors are fragile. Cleaning is safe when it is treated like a computer repair job, not a quick blast of air through the vents.
Below are the main risks and how a professional controls them.
ESD control (static electricity)
ESD means electrostatic discharge. It is the small static zap that can damage sensitive electronics.
In practice, this is handled by grounding and careful handling. We work on an ESD-safe surface where possible, discharge ourselves before touching internal parts, and handle boards by safe edges rather than pressing on chips or tiny components. It is simple, but it matters when you are dealing with modern laptop motherboards.
Fan safety and bearing protection
Fans are one of the easiest parts to damage during cleaning, mainly through overspin. If a fan is blasted with air and allowed to freewheel, it can spin far faster than normal use, which stresses the bearing and can create electrical feedback.
A proper clean prevents overspin by holding the fan still when clearing dust, or by cleaning it in a controlled way once it is accessible. We also check the fan for cracks, wobble, and signs of rubbing. If the blades are catching the housing, cleaning alone will not fix it for long, and it is better to know that before you rely on the laptop for work.
Connector care (where most accidental damage happens)
Many internal cables use ribbon connectors and small locks. ZIF means Zero Insertion Force, which is a flip-up latch that holds a ribbon cable in place.
These connectors are safe when handled correctly, and easy to break when forced. Professional cleaning includes taking time with the fiddly bits. That means opening ZIF locks in the right direction, supporting fragile clips, routing antenna leads carefully, and not pulling on cables by the wire. If a connector feels wrong, we stop and re-check, because forcing it is how sockets get lifted off the board.
Screw management and correct reassembly
Laptops use different screw lengths in the same bottom cover. Putting a long screw where a short one should be can puncture a board, dent a battery, or stress the case until it cracks.
A professional process tracks screw locations and lengths, and the laptop is reassembled with the correct tension. Too loose causes flex and rattles. Too tight can strip threads or warp panels. It is not glamorous work, but it is part of why the machine comes back feeling normal.
Why compressed air is used carefully, if at all
Compressed air can help, but it also causes problems when it is the only tool used. It can drive debris deeper into the heatsink fins, blow dust into places it should not go, and it can spin fans too fast. Some cans also spit cold propellant or moisture if used at the wrong angle.
The safer approach is direct access and controlled removal. That might involve a soft brush and vacuum setup designed for electronics, and targeted air only where it makes sense. The key point is that dust is removed from the machine, not just moved around inside it.
Thermal system integrity after cleaning
The thermal system is the parts that move heat away from the processor, mainly the heatsink, fan, and thermal pads. Thermal pads are soft strips that bridge gaps to help transfer heat.
If the heatsink is disturbed during cleaning, it needs to go back flat and even. Screws are tightened in the correct pattern so the contact pressure is consistent. If thermal pads are moved, they must be put back in the right place and not folded or torn. A pad that is slightly out of position can turn into a hotspot later, even if the fan is spotless.
Practical judgement call: if a laptop is running cool and quiet and the heatsink does not need to come off to clear the dust properly, leaving it in place can reduce risk. If it is overheating or packed with lint in the fins, it is usually worth doing the deeper clean and rechecking the thermal contact properly.
When you book a professional clean, it is reasonable to ask what will be opened, whether the fan will be removed or immobilised, and how reassembly is checked. Clear answers usually indicate a careful process.
Can cleaning damage components? The honest risks
There is always some risk when a laptop is opened, but it is usually small and it can be managed with a careful process.
Yes, cleaning can damage components. Not because cleaning is inherently dangerous, but because laptops are compact, tightly built, and often already a bit worn by the time they need attention.
The biggest risk factor is age and previous repairs. Older plastics can go brittle, especially around clips and vent areas. Screws can be stripped. Clips can be missing. Sometimes we find non-standard screws where someone has used whatever they had to hand, which can crack the case or bite into the wrong layer when it goes back together.
Design matters too. Some models are simply more fragile to work on. Thin ribbon cables are common, and they do not like being bent or pulled. A ribbon cable is a flat, flexible cable used for keyboards, trackpads, and buttons. Some batteries are glued in, which increases the chance of cosmetic damage during access. Tight-fit hinge areas can pinch cables, and the plastic around hinge mounts is often under stress already.
Liquid damage or corrosion changes the picture again. Even if the laptop is currently working, corrosion can make connectors weak. When you try to unplug a cable, the plastic can crumble or a metal contact can tear away. That is not a cleaning fault as such, it is a condition issue, but it is still a real risk when anything is moved.
How do we keep it safe? We start by documenting the condition as we open the machine. That includes noting missing screws, damaged clips, bulges, and any signs of previous work or liquid exposure. We then work slowly around fragile areas, support connectors properly, and avoid forcing anything that does not feel right.
If something is unsafe to proceed, we stop and discuss it. For example, if a corroded connector looks like it may break when unplugged, it can be better to leave a deeper strip-down for a repair appointment rather than pushing on during a routine clean. That is a judgement call, but it is usually the right one if you rely on the laptop for work and cannot risk turning a preventative visit into downtime.
Practical advice: if your laptop has had a drink spilt on it, has been opened before, or has a cracked hinge area, say so when booking. It helps us plan the right level of access and gives you a clearer idea of what is sensible to do on the day.
How long professional laptop dust cleaning takes
Realistic timeframes depend on how far the laptop has to come apart, plus queue and testing time.
Most of the time is not the actual dusting. It is safe access, careful cleaning, and then putting everything back together properly. Some laptops let you reach the fan and vents from the bottom cover. Others need the motherboard lifted to get to the cooling system, which adds time and risk.
A straightforward model, where the fan and heatsink are accessible and screws cooperate, is usually a shorter job. A complex build can take longer because it needs deeper disassembly. This is common on thin business laptops, gaming models, and machines with tight internal layouts.
Here are the main factors that affect how long it takes:
- Number of fans – one fan is simpler than two or three, and each fan needs to be cleaned and checked.
- Vapour chamber layouts – a vapour chamber is a flat heat spreader used instead of simple heat pipes, and it can make access more involved.
- Accessibility of the heatsink – if the heatsink can be cleaned in place safely, it saves time. If it must come off to clear packed lint from the fins, it becomes a deeper job.
- Seized or stripped screws – stuck screws slow everything down, and forcing them is how cases get marked or threads get damaged.
- Prior damage or previous repairs – missing screws, cracked plastics, bent covers, and non-standard screws all make reassembly more fiddly.
It also helps to separate bench time from turnaround time. Bench time is the hands-on time we spend opening, cleaning, reassembling, and checking the machine. Turnaround time includes workshop queue, cooling and thermal checks, and any follow-up testing we do before it goes back to you.
Testing matters, even for a cleaning job. After reassembly we normally want to confirm the fans behave properly, the laptop is stable under load, and there are no new noises or warning lights. That can add time compared to a quick open-and-blast approach, but it is usually the difference between a clean that lasts and a clean that comes back with a rattle.
Practical judgement call: if you need the laptop for work the same day, tell us when you book. Sometimes we can plan a lighter clean that targets the obvious airflow blockages without committing to a full strip-down, and then schedule the deeper work when you can be without the machine for longer. It is not always the right choice, but it can reduce disruption when the laptop is still running cool and stable.
If you want a more accurate estimate, the fastest way is to share the exact model number and describe the symptoms. Overheating, sudden fan surges, or shutdowns usually point to a deeper clean being needed, which is more time on the bench and more time for checks afterwards.

Is it worth paying for laptop dust cleaning service?
Think of it as paying to get cooling back to how the laptop was designed to work, so it stays reliable under your normal workload.
It can be worth it when dust has started to restrict airflow. A laptop only cools properly when air can move through the fan and heatsink fins. When those fins clog, heat stays trapped inside the chassis.
When airflow is restored, you usually see practical benefits. Lower temperatures. Less fan noise because the fan does not have to run flat out all the time. Reduced throttling – that is when the laptop slows itself down to stop overheating. And fewer thermal shutdowns where the system turns off to protect the hardware.
The value depends on how you use the machine. If you game, do video work, or run heavy software for long stretches, you tend to notice the difference sooner because the cooling system is under steady load. If you sit in long Teams or Zoom calls on battery, a cooler laptop often behaves better too, because heat and sustained boost clocks are not a great mix. For basic office use, email, and web, it is more about noise and long-term reliability than speed.
It also helps to be clear about what cleaning is, and what it is not. Cleaning is maintenance. It restores cooling efficiency. It is not a performance upgrade in itself, and it will not fix a laptop that is slow because of software issues, a failing drive, or not enough memory.
There are times when it may not be worth it. If the laptop is very old, low value, and already has multiple issues, it can be better to put money towards replacement or essential laptop repairs only. Another common one is a failing fan. If the fan bearings are noisy or the fan is intermittently stopping, cleaning alone is not the right answer, because the part likely needs replacing anyway.
A practical judgement call I often make with business clients is this: if the laptop is relied on daily and you have seen overheating, sudden fan surges, or shutdowns, treat cleaning as preventative maintenance, not a nice-to-have. If it runs cool, stays quiet, and the vents are clear, it may be sensible to leave it alone and re-check later rather than opening it up just because it is due.
What a good shop will check and report back
Clear notes and simple evidence, so you know what you paid for without being sold extra work
After a professional dust clean, you should not be left guessing. A good shop will tell you what they actually did, what they found inside, and what (if anything) needs attention next. That is not about a fancy report. It is about making the work accountable.
At minimum, you should get a clear description of what was opened and cleaned. For example: internal dust removal, fan cleaning, and heatsink fin cleaning. The heatsink is the metal part that moves heat to the vent area so the fan can push it out.
You should also be told what the blockage looked like. Common findings are dust mats packed into the intake area, a blocked fin stack (the thin metal fins at the exhaust), or fluff wrapped around the fan hub. Those details matter because they explain the symptoms you noticed, like sudden fan surges or a hot palm rest.
If there are signs a fan is on its way out, that should be called out plainly. Things like rough bearings, wobble, a ticking noise, inconsistent spin-up, or the fan not reaching normal speed. Cleaning can remove the dust, but it cannot fix worn bearings.
Any recommendations after cleaning should be specific and linked to what was found, not generic upselling. Typical examples include suggesting a fan replacement if the bearings are noisy, a thermal paste service if the paste has dried out, or a hinge repair if the hinge mounts are cracking and flexing the chassis. Thermal paste is the thin layer that helps heat move from the CPU or GPU into the heatsink.
A careful shop will also flag other risks that show up while the laptop is open. Battery swelling is a big one, as it can press on the trackpad or distort the case. Liquid damage concerns should be mentioned if there is visible residue or corrosion, even if the laptop is currently running. You want that on record because it can explain future instability.
Before and after observations should be in plain language. Not a chart that you cannot interpret. For example: fan noise reduced at idle, airflow at the vent feels stronger, and the laptop no longer ramps the fan aggressively during normal office work. Temperature behaviour can be described as “stays steady under your usual load” rather than promising a specific number, because every model and workload is different.
Photos can be useful, especially if you are approving extra work, but they are not always standard. If you want them, ask when you book. It is a reasonable request, and it sets expectations upfront without slowing the job down unexpectedly.
One small judgement call: if the shop recommends additional work, ask one question – “What did you see that makes this necessary now?” A good engineer can answer that in a sentence and relate it back to reliability, not speculation.
Common laptop types and special cases
Different designs need different handling, so the cleaning method changes to stay safe and effective.
Laptops are not built to one pattern. The outside can look similar, but the way the cooling system is laid out, how the case clips together, and how cables run across the board varies a lot. A careful clean starts with recognising what type of machine it is, then choosing the safest route in and out.
Thin-and-light laptops are usually the most delicate. The cooling is tight, with very little space for airflow, so a small amount of dust can make a noticeable difference. The trade-off is that the plastic clips and screw posts can be fragile, and it is easier to crack trim pieces if someone rushes the opening process. These are the machines where slow, controlled disassembly matters as much as the cleaning itself.
Gaming laptops and mobile workstations tend to have more going on inside. Often there are multiple fans, and the CPU and GPU can share heatpipes. Heatpipes are sealed metal tubes that move heat from the chips to the heatsink. On these systems, proper fin-stack cleaning matters because the fin stack can block even when the fan itself looks fairly clean from above. Done properly, you get airflow back where it counts, not just a “looks tidy” result.
MacBooks and other glued designs need a different approach again. Some parts are held with adhesive rather than screws, and internal routing can be tight around the battery and trackpad cables. Batteries also sit close to the work area, so the risk is less about dust and more about avoiding accidental strain, puncture, or connector damage. A professional will plan the order of steps and use the right tools so nothing gets levered or pulled where it should not be.
Business laptops are often sensibly made for servicing, which helps. That said, they can still hide screws under rubber feet, labels, or small covers, and it is easy to miss one and crack a corner if you force the base off. Many also have dock connectors, smartcard parts, or internal shields that need to go back exactly as found for reliability.
Practical advice: when you book a professional clean, mention the symptoms and how you use the laptop. For example, “fan ramps up on Teams calls” or “gets hot when plugged into two monitors”. It helps the engineer focus on the likely airflow path and confirm the result afterwards.
One small judgement call: if your laptop is a very slim model or a glued design, it is usually worth choosing a service that is happy to take a little longer rather than one that promises the fastest turnaround. The time is not for cleaning dust. It is for opening and reassembling without stress on plastics, cables, and connectors.
FAQ
Words from the cleaning experts
We often see the same pattern: a laptop that used to stay quiet slowly starts running hot, then the fan ramps up even during simple work. A common problem is dust packing into the heatsink fins until airflow is basically choked, and the machine has no easy way to get rid of heat.
Professional cleaning is safe when it is done as a controlled, fault-led job rather than a quick blast and hope. If the laptop is stable but showing clear cooling strain, a proper internal dust removal and fan and heatsink cleaning is a sensible maintenance step. If the machine is already showing unrelated power or stability faults, cleaning alone is not the right lever, and it is better treated as part of diagnosis rather than a standalone fix.